
How to plan accessible entrances, circulation spaces and room layouts, with practical guidance based on Approved Document M.
Good accessibility is largely decided by the floor plan, long before detailed design even begins. The position of an entrance, the width of a hallway, the relationship between a bedroom and bathroom, even the space left beside a door can all determine whether a home feels easy to use or presents a daily obstacle course.
In Part 1 of this series, Accessible Design in Architecture: Designing Homes That Work for Everyone, we explored the importance of accessibility in residential design, looking beyond minimum standards to consider changing needs and the principles of Universal Design.
In this Part 2, we look at what that means for the layout specifically. We use Approved Document M, Volume 1 for dwellings in England, as our main regulatory reference throughout.
Understanding Part M
Let’s first take a look at the regulatory framework to understand the dimensions discussed in this post.
Part M of the Building Regulations sets requirements for ensuring that buildings are accessible and usable by a wide range of people, including disabled people, older people and those with reduced mobility.
Approved Document Part M is divided into two volumes:
- Volume 1 applies to dwellings.
- Volume 2 applies to buildings other than dwellings, such as offices, shops, schools and public buildings.
Approved Document M Volume 1 sets out three categories for new dwellings:
- M4(1), Category 1: Visitable dwellings
- M4(2), Category 2: Accessible and adaptable dwellings
- M4(3), Category 3: Wheelchair user dwellings
M4(1) applies to all new dwellings unless an optional requirement for M4(2) or M4(3) is imposed through planning permission.
The dimensions discussed throughout this article should be understood as regulatory benchmarks rather than universal measures of comfort. Where a home is being designed for a particular person, their equipment, mobility, reach and movement patterns should inform the design wherever possible.
Designing an Accessible Approach
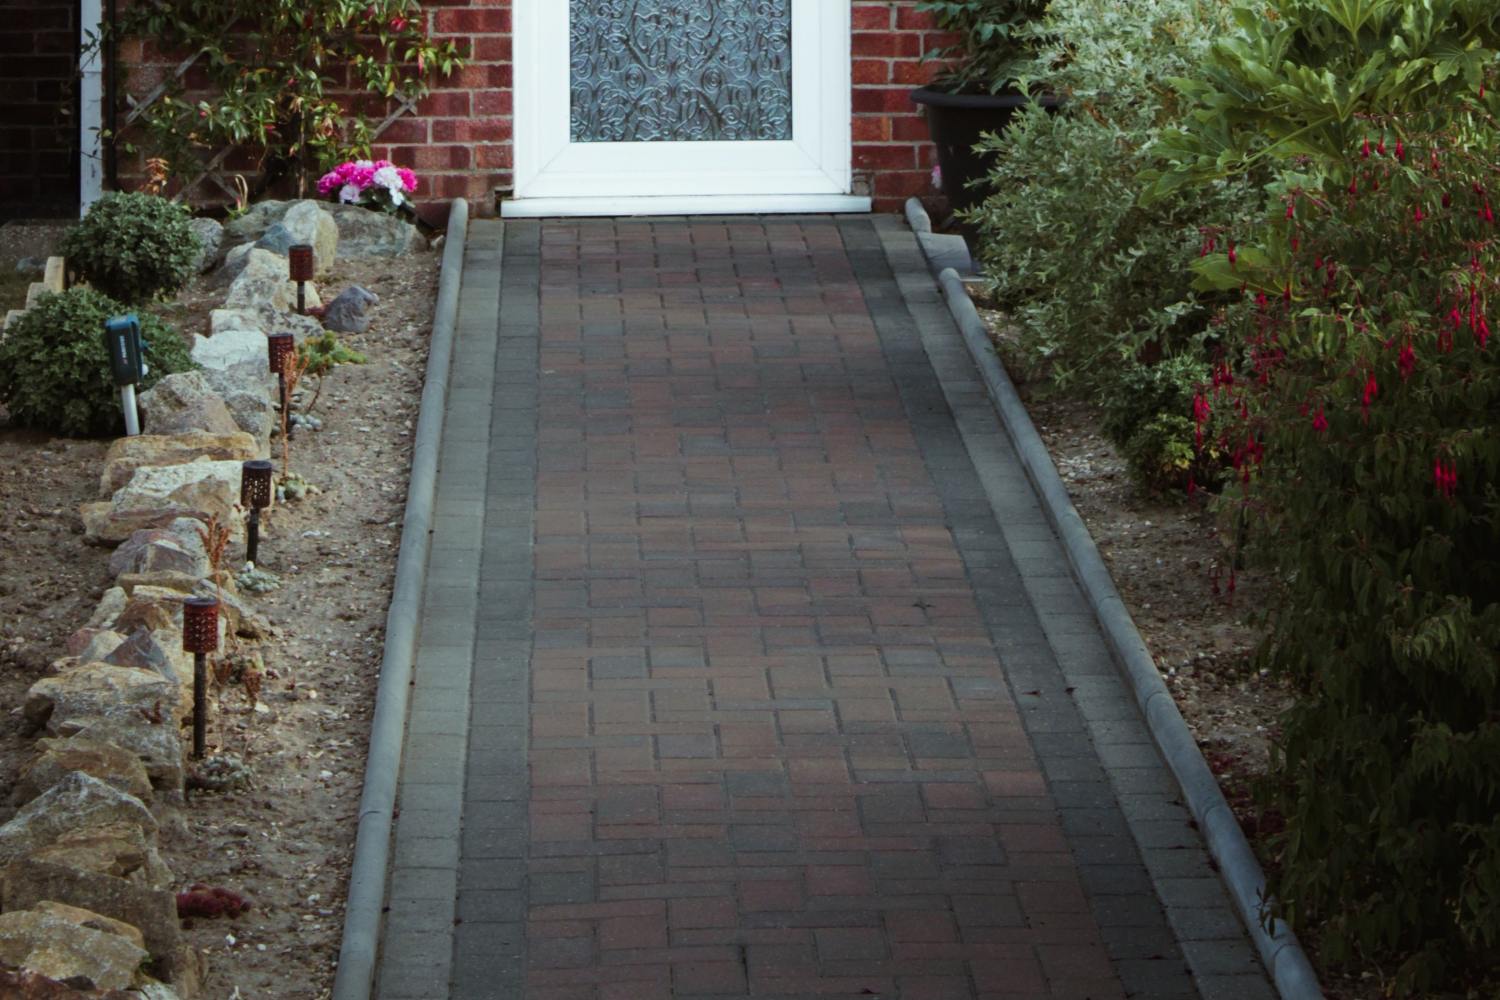
The experience of approaching a home sets the tone for everything else that follows. It creates an important first impression and deserves the same level of care as the interior. Steps, steep gradients, uneven paving, narrow gates and abrupt thresholds can all be barriers before someone has even reached the front door.
Wherever reasonably achievable, aim to provide step-free access to the principal entrance, with enough space to approach and enter comfortably. Where this genuinely cannot be achieved, Part M provides for alternative arrangements like a separate step free entrance in certain circumstances.
Parking and drop-off points
Think about the complete journey between the vehicle and the entrance, not just the parking space itself. For an M4(2) dwelling, at least one standard parking space within the private curtilage should be capable of being widened to 3.3m. Where communal parking is provided for a block of flats, at least one standard parking space should be provided close to the principal communal entrance of each core.
On constrained sites like existing terraced streets, the parking arrangements may be largely outside your control. Even then, it is worth looking at the relationship between the likely drop-off point, the pavement, the site entrance and the front door, while avoiding unnecessary changes in level or indirect routes where you can.
Paths and gradients
The route leading up to the house should be legible and free from unnecessary obstacles. Be sure to check its width against gates, planting zones, bin stores and other elements that could narrow it.
For an M4(2) dwelling, Approved Document Part M recommends:
- a minimum clear width of 900mm for private approach routes, reducing to 750mm only at limited localised obstructions;
- a minimum clear width of 1,200mm for communal routes, with limited reductions to 1,050mm;
- a minimum clear gate opening of 850mm, with a 300mm nib to the leading edge of the gate;
- level, gently sloping or, where necessary, ramped access.
Some sites have natural changes in level, while on others gradients may be introduced as part of the landscape design. Either way, the relationship between external ground levels and the finished floor level should be resolved early. Leaving this until later can result in haphazard entrance arrangements.
A level or near-level transition is generally easier for a wide range of people to use, including wheelchair users, people using walking aids and families with pushchairs.
Where a ramp forms a part of the approach, it should not simply be fitted into leftover space. Its position, length, landings and relationship with the wider route should be considered from the outset.
Part M gives permissible ramp gradients between 1:20 and 1:12, with the maximum flight length varying according to the gradient. This can have a significant effect on the amount of space required, especially on constrained sites.
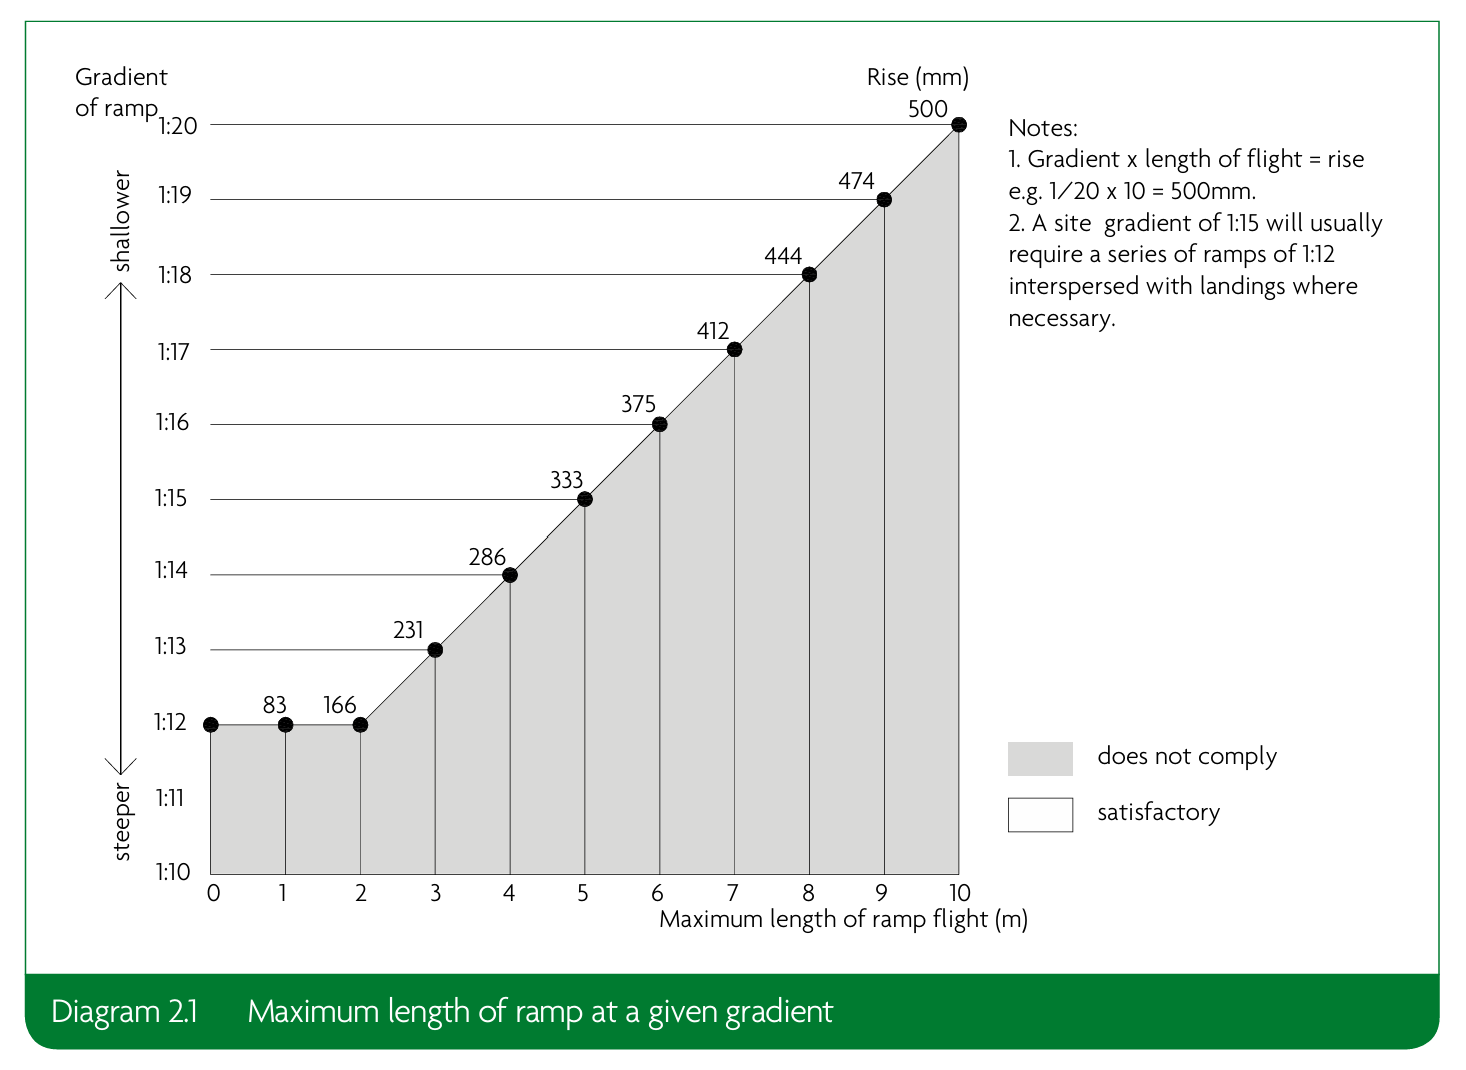
Image Credit: Approved Document Part M
If you need help working out slopes and gradients, check out our How to calculate slopes and gradients post. And for further information on ramp design, including a slope, length and gradient calculator, see Designing Accessible Ramps in Line with Part M.
Porch
The space immediately outside the front door matters just as much as the route leading to it. It can act as a useful transitional space, offering shelter and somewhere to pause before entering or leaving the home.
For an M4(2) dwelling, the principal private entrance should also have a level external landing at least 1200mm wide and 1200mm deep, with a covered area at least 900mm wide and 600mm deep.
A larger porch can also provide useful space for coats, mobility equipment and other everyday items, provided it does not compromise the clear space required at the entrance.
Entrance door clearance
The entrance door should be considered as part of the wider arrival sequence. The approach, external landing and doorway should work together so that a person has enough room to arrive, manoeuvre and pass through the entrance comfortably.
For an M4(2) dwelling, the principal private entrance should provide a minimum clear opening width of 850mm. Part M also specifies a 300mm nib to the leading edge of the door in relevant situations, with the additional width maintained for 1200mm beyond it. Where a porch or lobby is provided, the doors should be at least 1500mm apart, with at least 1500mm between their swings.
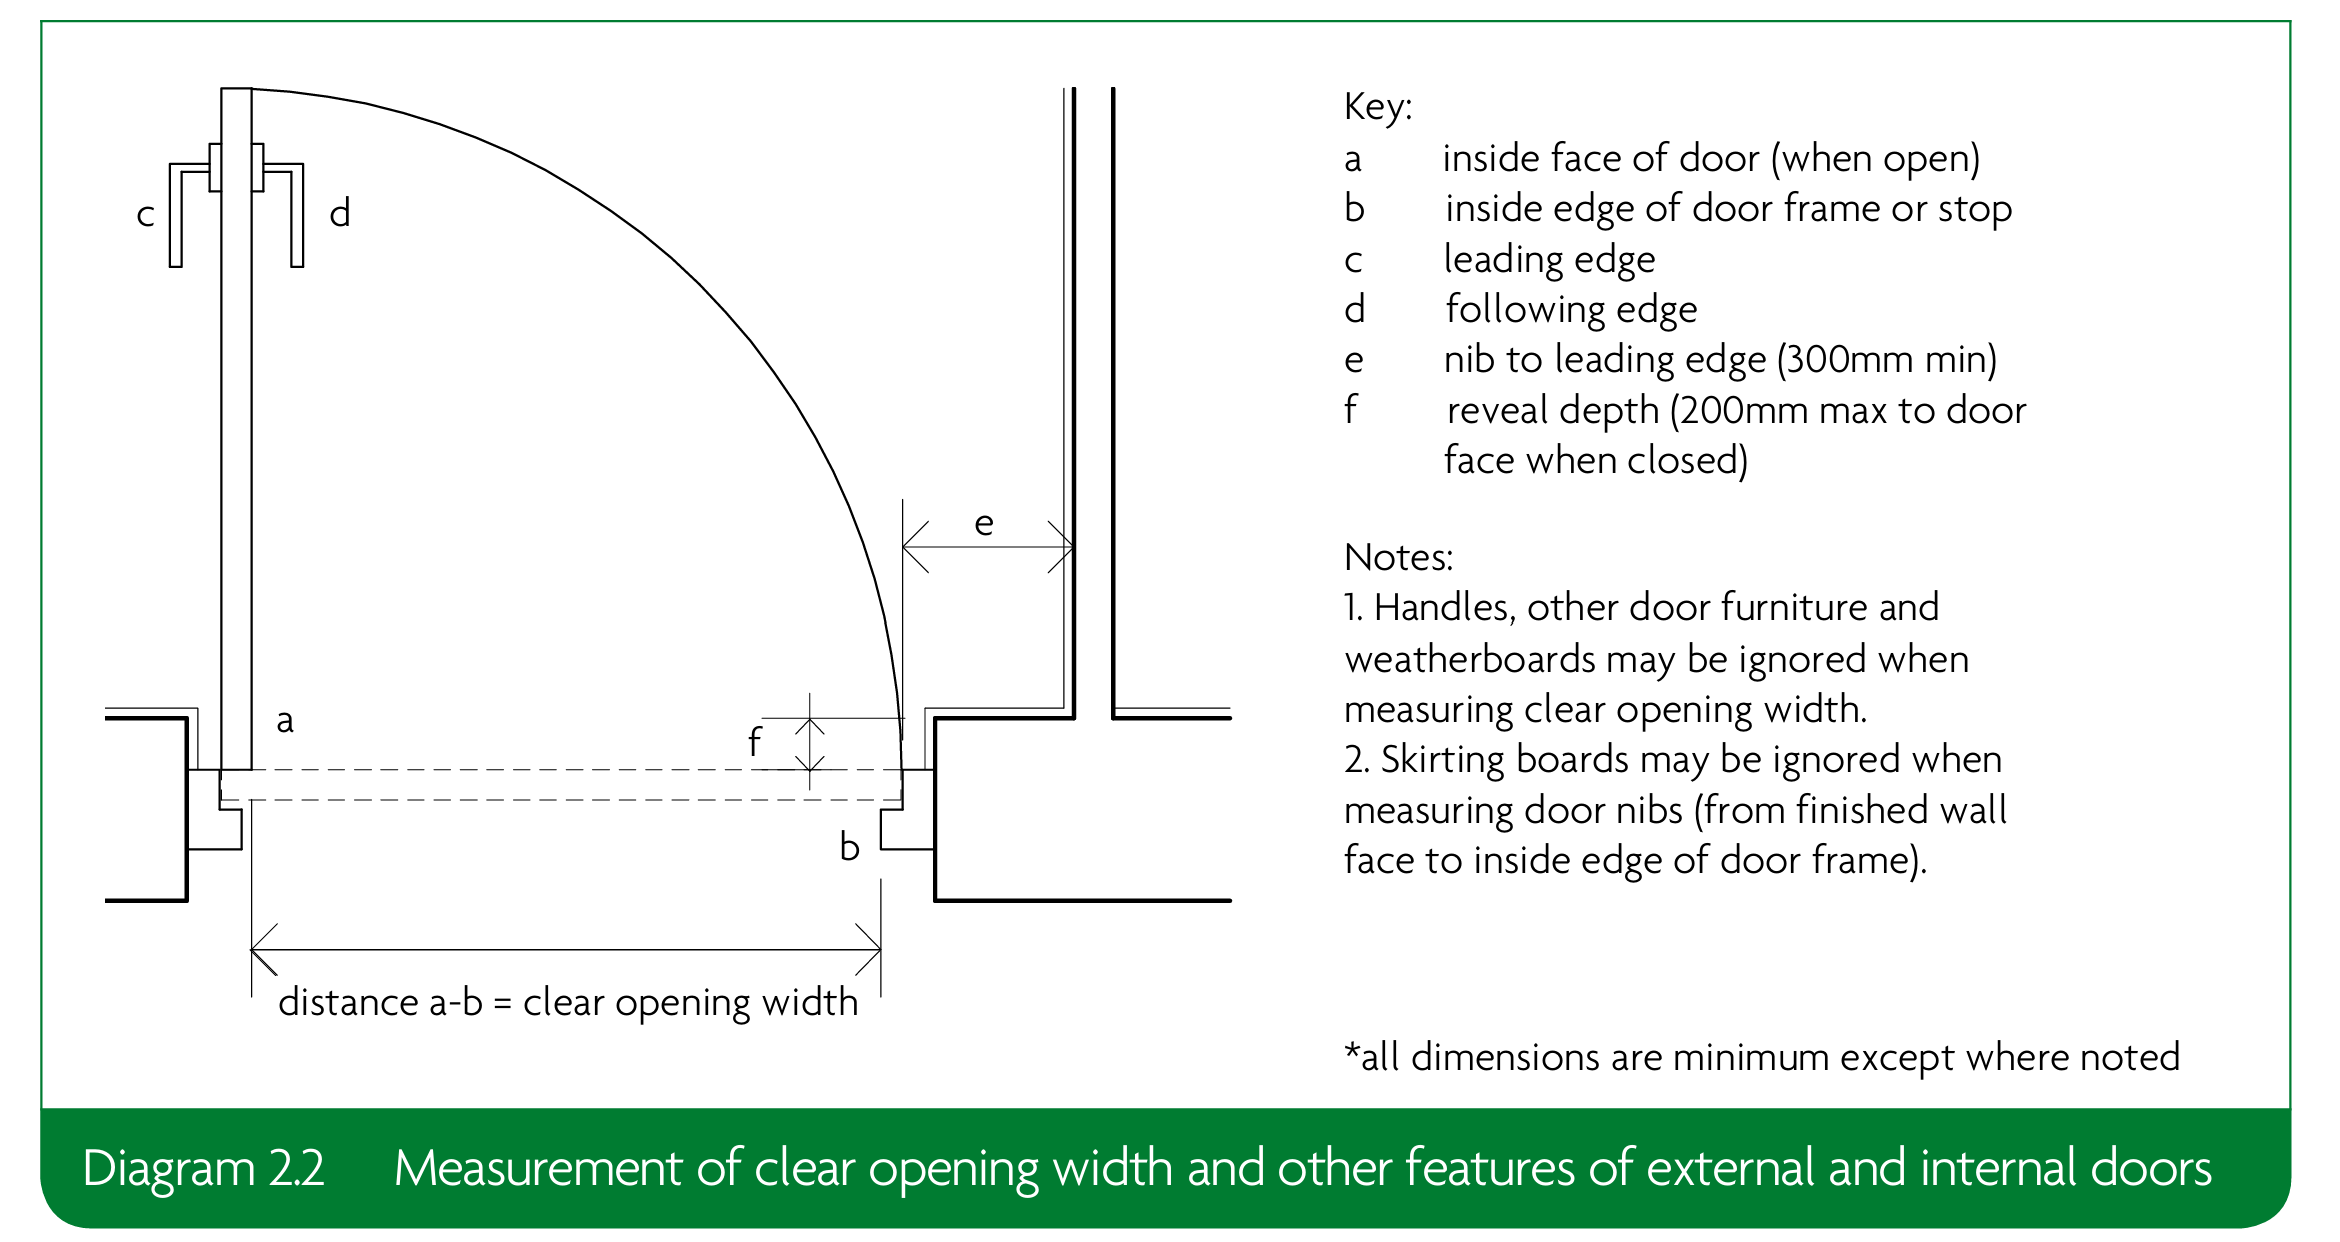
Image Credit: Approved Document Part M
Door position and opening direction should also be resolved while the layout is being developed. A door placed too close to a return wall, storage area or another door can undermine otherwise generous circulation space.
Creating Clear Circulation
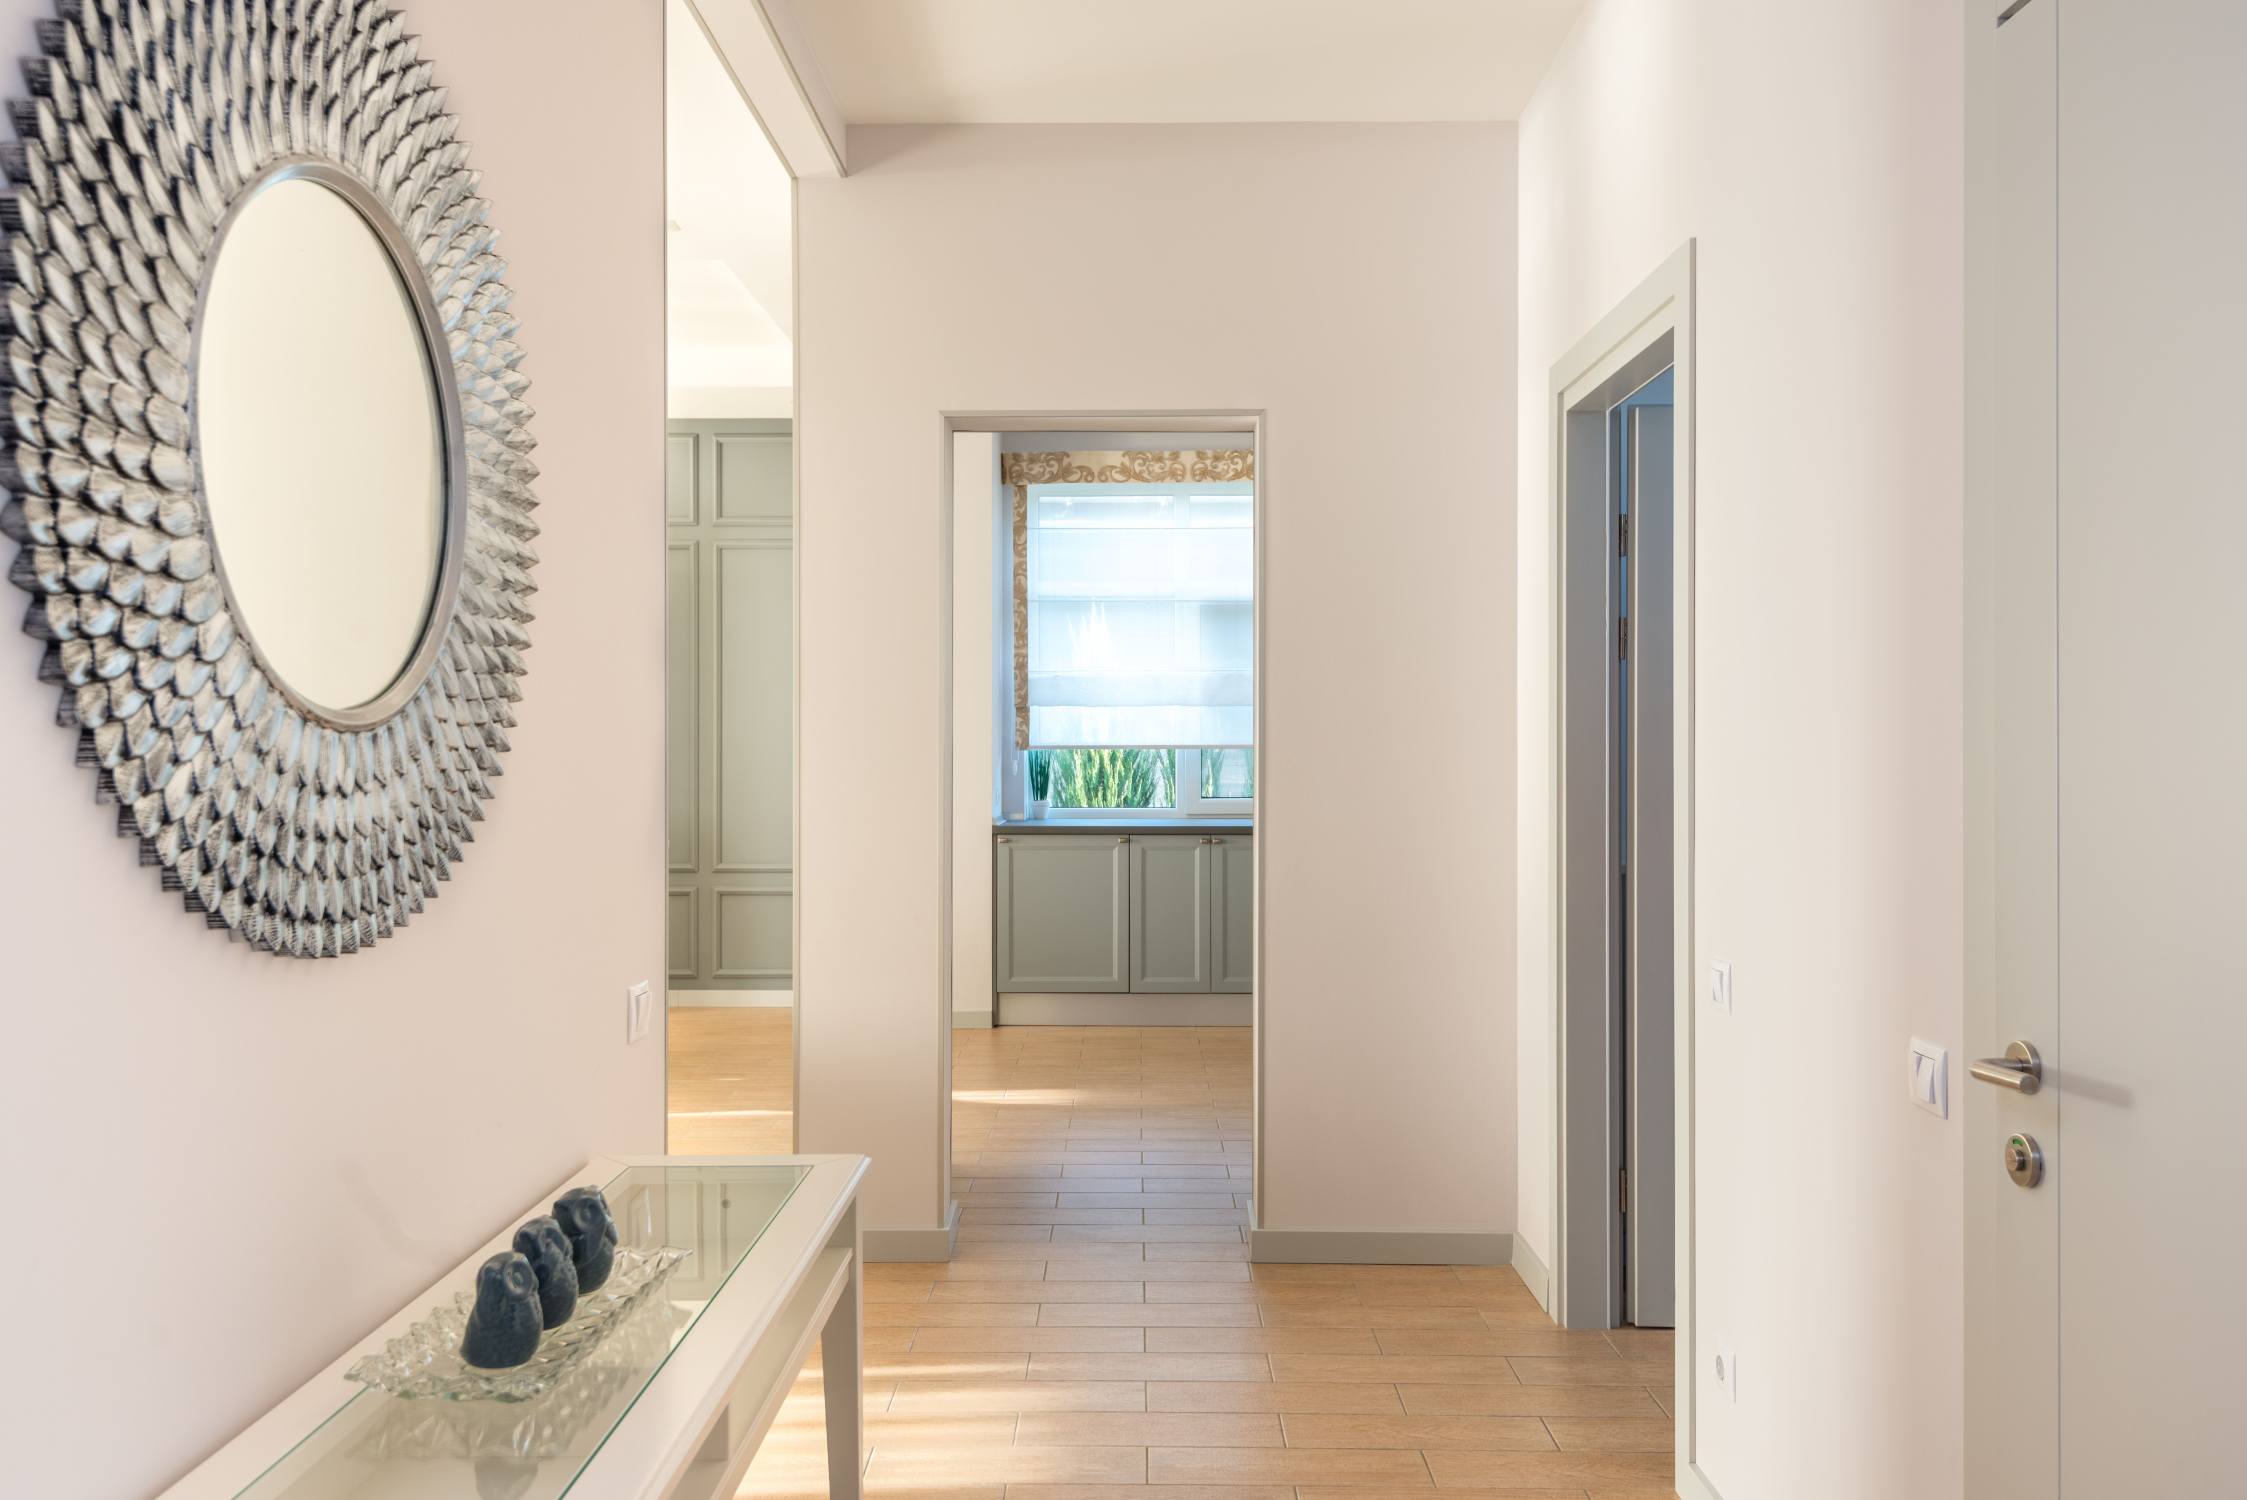
Then inside the home, the focus shifts from arrival to movement. Circulation should feel smooth rather than something a person has to constantly work against. Clear sightlines, consistent room relationships and a small number of easy-to-understand routes also reduce the mental effort of navigating a home. This can be particularly important where a resident may find complex or unpredictable environments challenging.
Hallway Widths
For an M4(2) dwelling, Approved Document Part M recommends a minimum clear width of 900mm for halls and landings. Localised obstructions like radiators, may reduce this width but the clear passage should not fall below 750mm and obstructions should be kept away from doorways and changes in direction.
Internal door widths should also be considered together with the width of the corridor or passageway from which they are approached. Part M allows different combinations of clear door opening and corridor width depending on whether the approach is head-on or from an angle. For internal doors on the entrance storey, Part M also requires a 300mm nib to the leading edge of inward-opening doors in relevant situations.
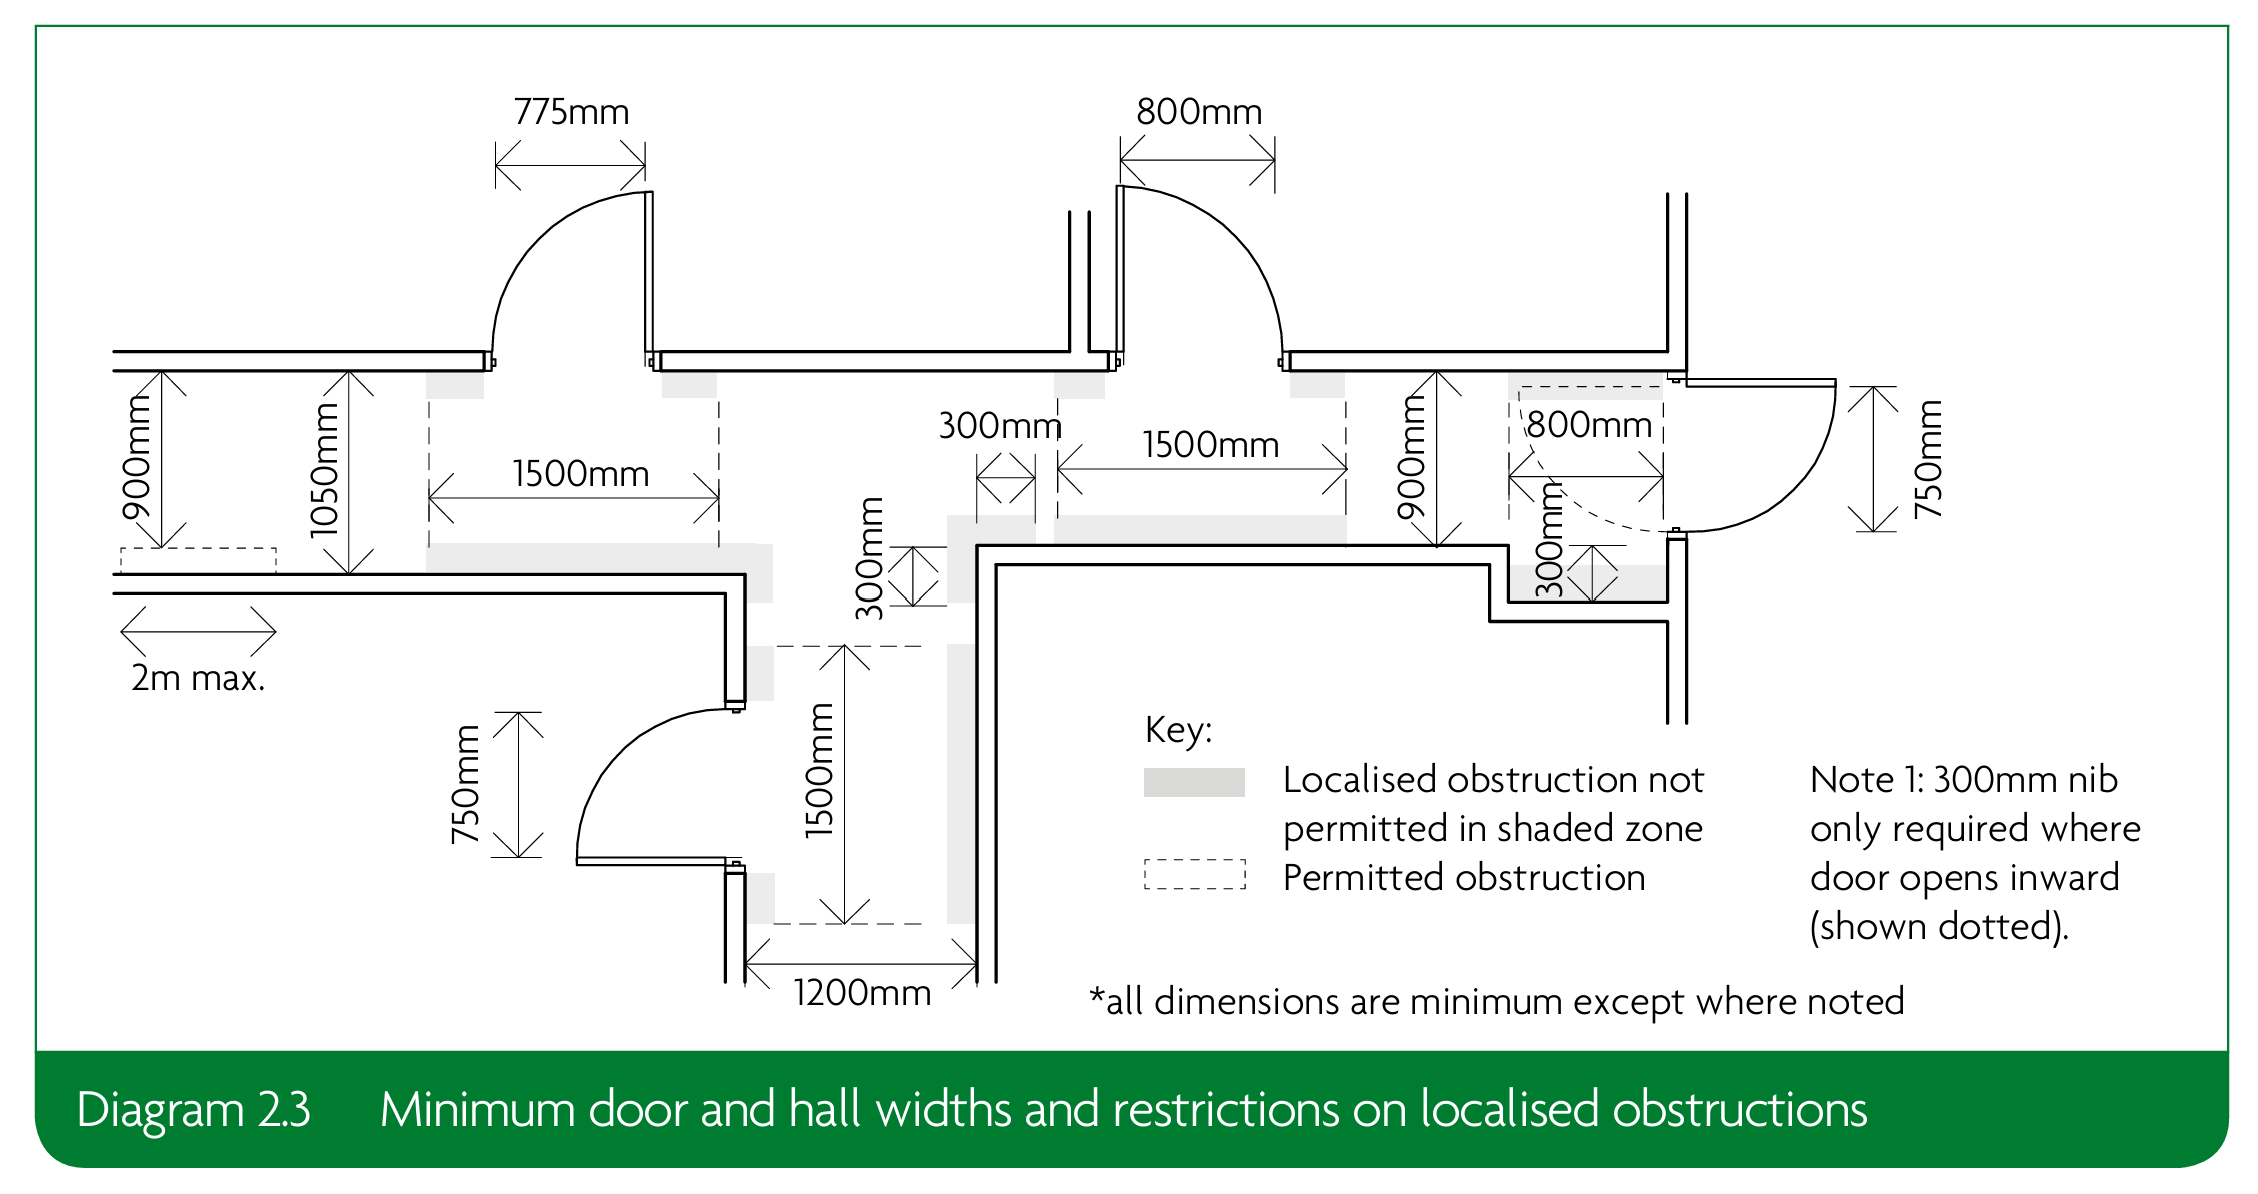
Image Credit: Approved Document Part M
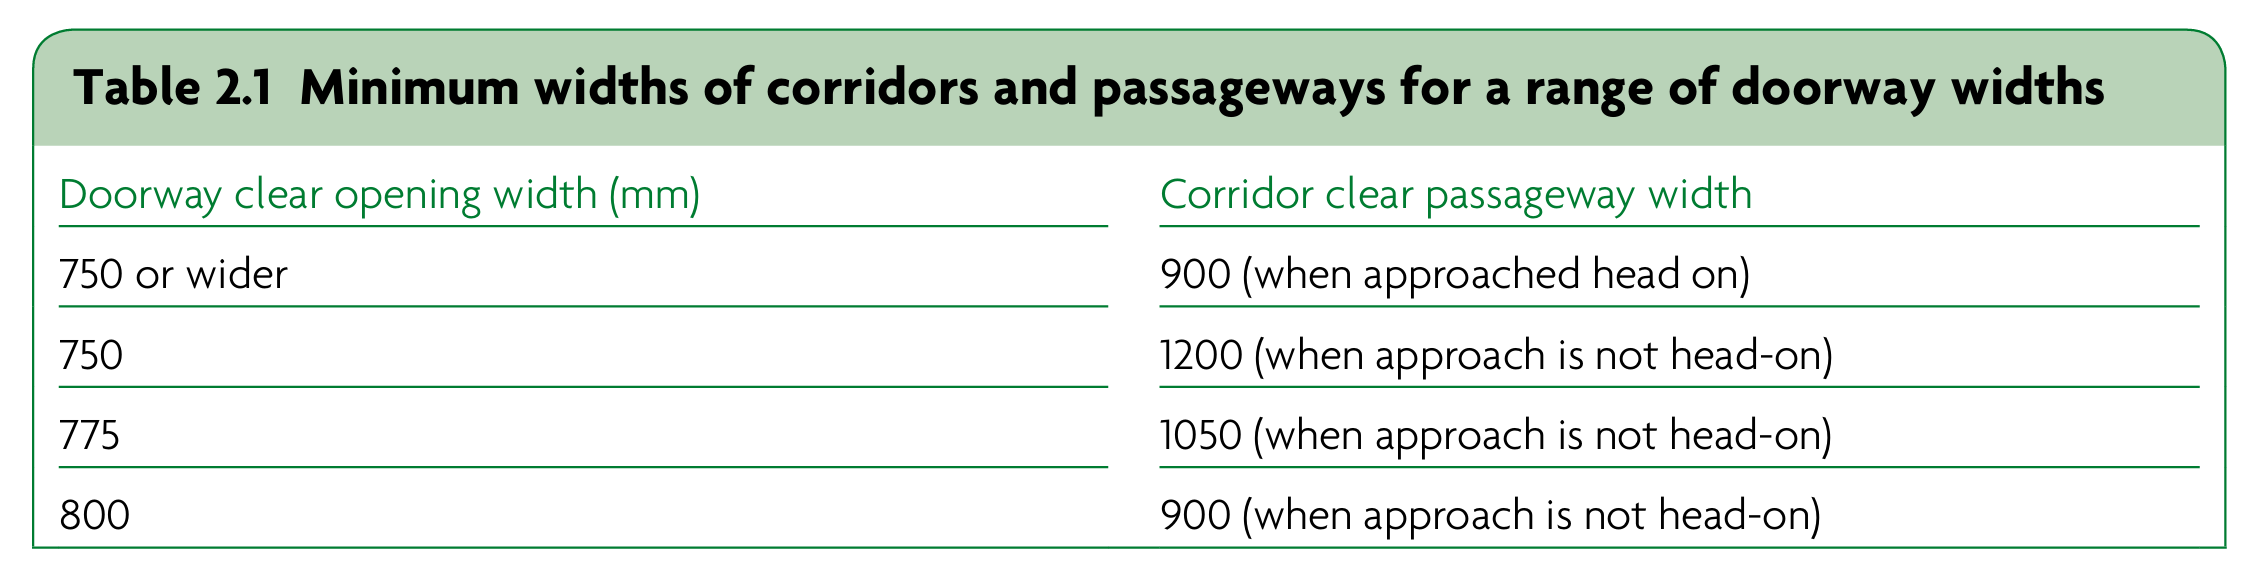
Image Credit: Approved Document Part M
Avoiding Pinch Points
Changes in direction, corridor junctions and spaces outside frequently used rooms should provide enough room to turn and reposition comfortably. These areas can easily become pinch points once furniture, radiators, storage and other fittings are introduced.
Door positioning is also important. Doors placed too close to corners, directly opposite one another or within a tight cluster can make movement more difficult, with overlapping door swings creating additional obstructions. These potential pinch points should be considered early in the design process, so that circulation remains practical once furniture and fittings are in place.
Open-plan and Flexible Layouts
Open-plan arrangements can sometimes make movement easier by reducing unnecessary doors and narrow circulation spaces. They can also allow rooms to change function over time as the needs of the household change.
However, openness alone does not make a space accessible. Clear routes still need to be maintained, and the arrangement of furniture should allow different activities within the room to remain easy to understand and navigate.
Furniture
Accessibility should always be tested with realistic furniture layouts rather than assessed only from an empty floor plan.
Standard items like sofas, dining chairs, beds, wardrobes and storage can quickly reduce the amount of usable circulation space once they are in place. Check that the plan can accommodate them while keeping comfortable routes through the space.
Modular or adjustable furniture may provide additional flexibility, but it should not be relied upon to compensate for a layout that is already too constrained. The aim is to provide enough space for people to move naturally through the home without constantly having to negotiate around furniture or other obstacles.
Designing Comfortable Living Spaces
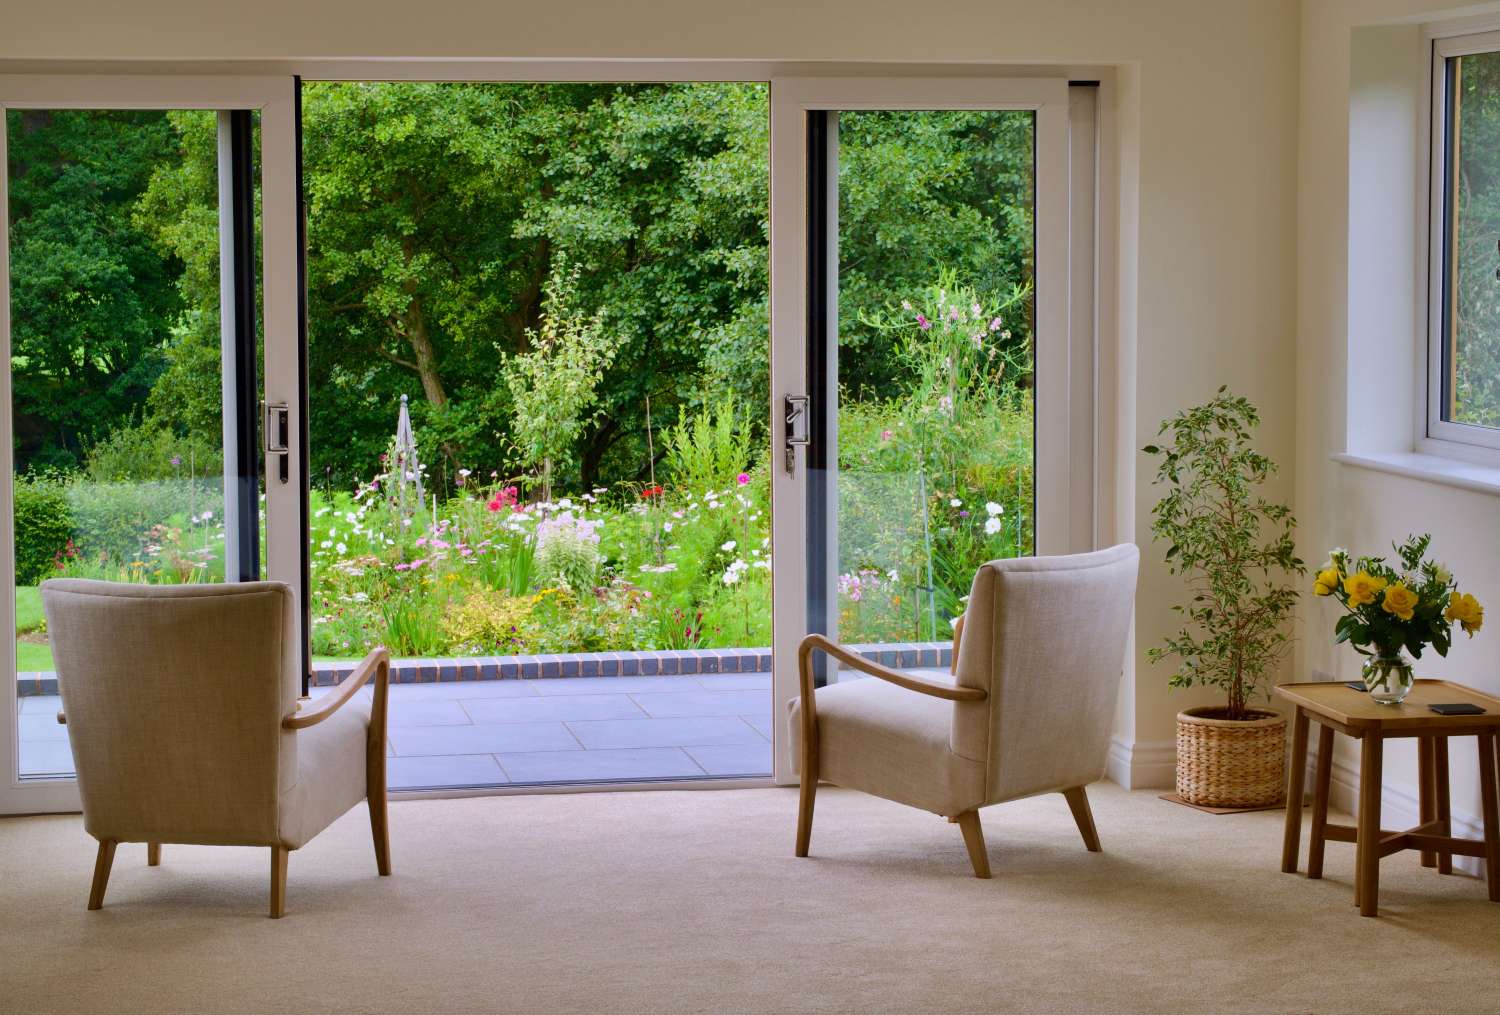
With circulation resolved, the next question is how comfortable the main living spaces are to actually occupy. Accessible design should support everyday life without making a home feel clinical or overly specialised.
Seating and Activity zones
Living rooms often need to accommodate several activities at once, from watching television and reading to socialising, resting or receiving assistance. These zones should be arranged so that one activity does not obstruct another or leave one user isolated from the rest of the room.
Think about seating from different positions and heights as well. A wheelchair user, for example, should be able to join a seating arrangement without being pushed to the edge of the room or left with a poor view of other people, the television or the outside.
It can also be useful to include a quieter area within the main living space. This might simply be a chair or small corner away from shared-space noise. Providing somewhere with lower levels of stimulation can benefit people who may become overwhelmed by busy environments.
Daylight and Views out
Natural light can make a space easier and more pleasant to use and so the position and height of windows should be considered alongside the furniture layout. Views should not only work for someone standing. Where possible, you should consider whether a seated person can see out comfortably and whether key views are blocked by high windowsills, deep furniture or poorly positioned glazing.
For M4(2) dwellings, Part M also sets a maximum height of 850mm above floor level for the start of glazing to the principal window of the principal living area, unless a greater height is necessary to comply with Part K guarding requirements.
Daylight should also be reasonably balanced across the room so that important areas are not left much darker than others.
Connection to outdoor space
A garden, balcony or terrace can significantly extend the usable living space if it is easy to reach and naturally connected to the main living area. The external door should be positioned so that the route to it is clear without cutting awkwardly through a seating arrangement or other activity zone.
Internal and external floor levels should also be coordinated early so that the transition can be made as smooth as possible. For an M4(2) dwelling, Part M applies relevant accessibility provisions to doors serving private outdoor spaces such as gardens, balconies and terraces, so this relationship should be considered as part of the initial layout rather than left until detailed design.
Accessible Kitchens
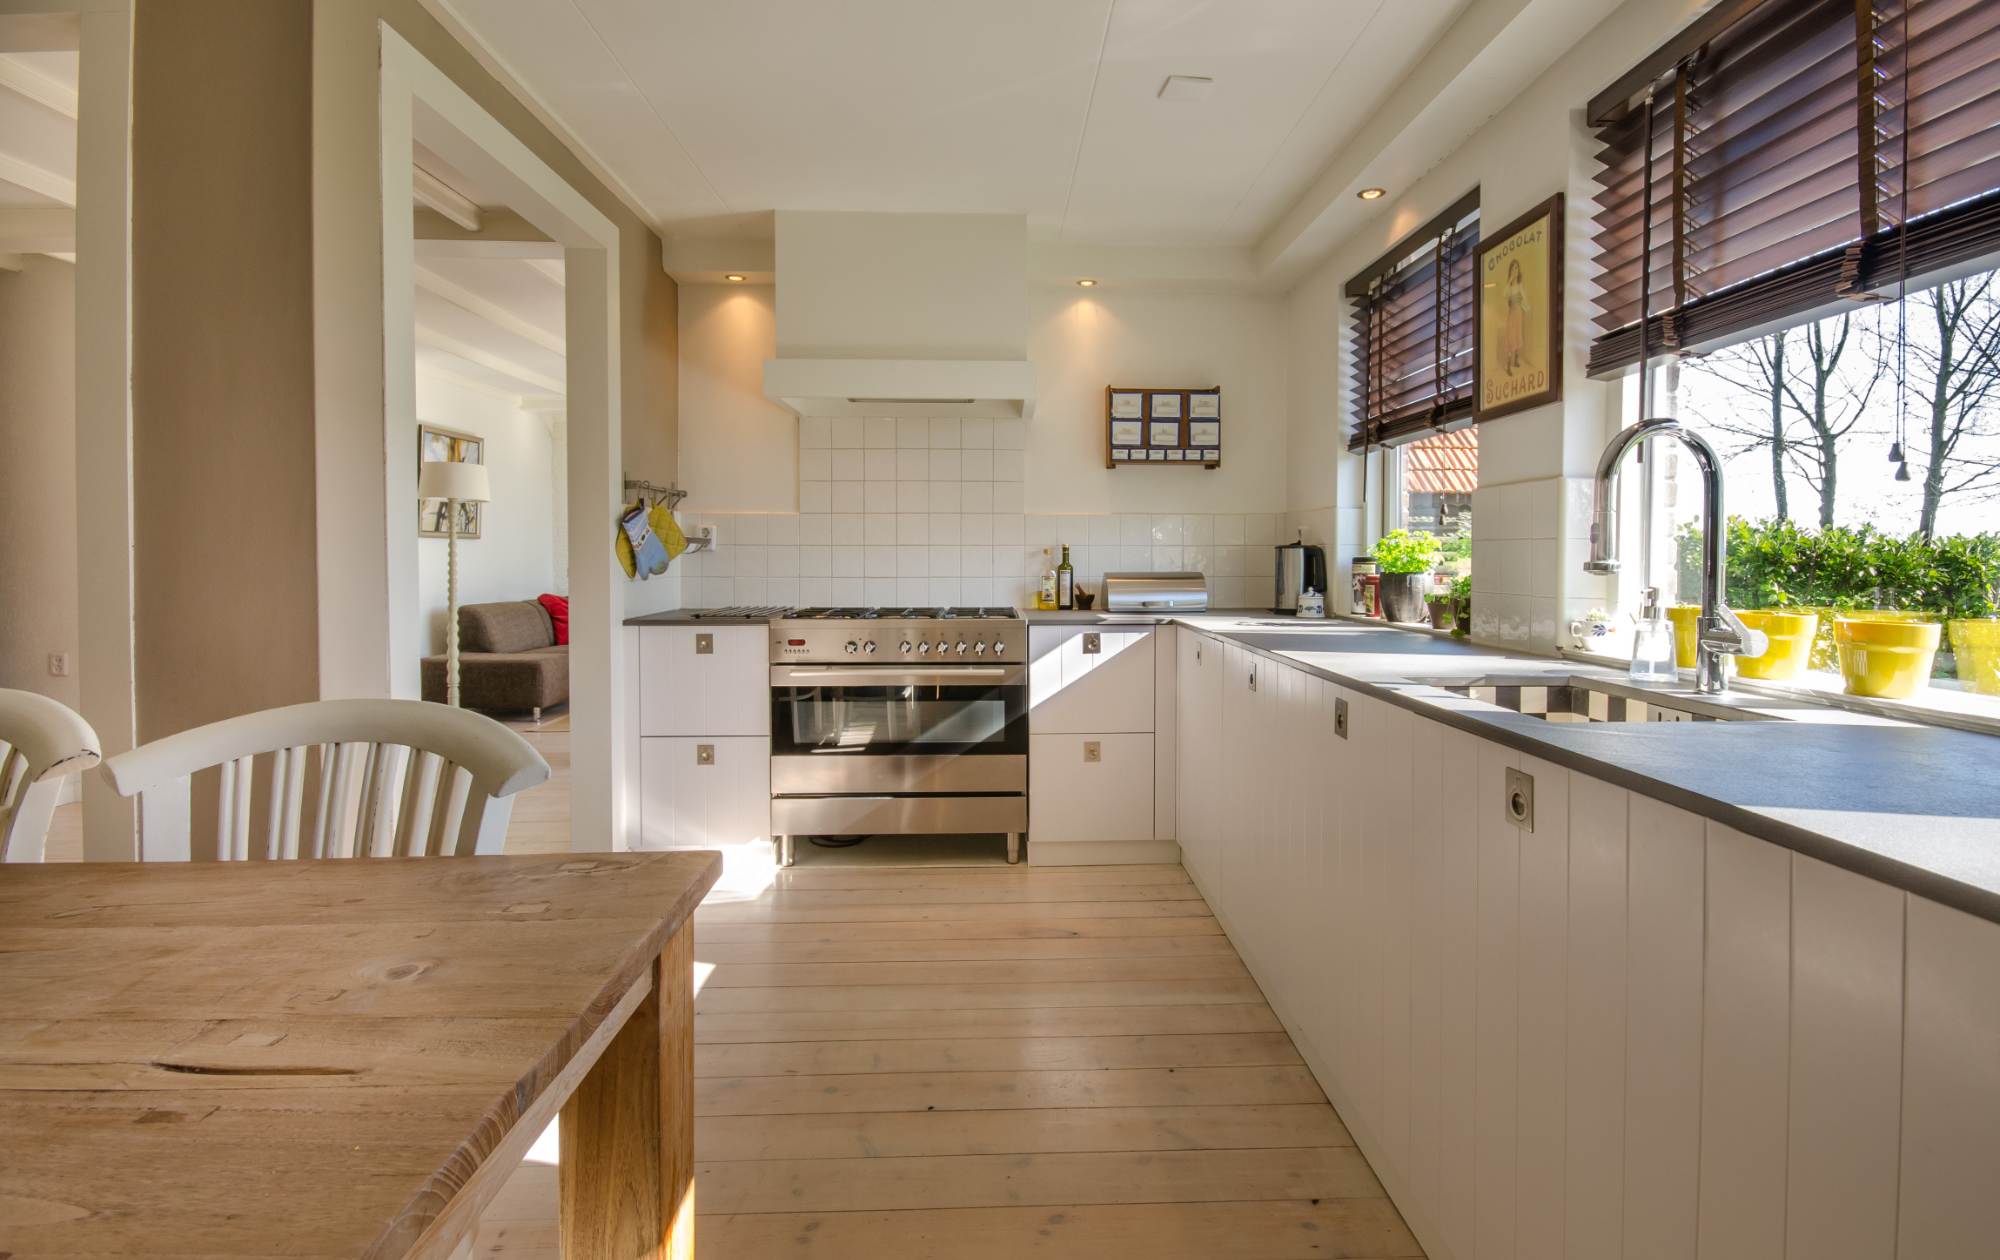
Kitchens involve frequent movement between preparation, cooking, washing and storage, so their layout should reduce unnecessary reaching and awkward movement while accommodating different users.
Work triangle
The relationship between the sink, hob, fridge and main preparation areas should be considered carefully. A traditional work triangle can be useful, but it should not be followed so rigidly that it creates unnecessarily long or difficult routes.
For an M4(2) dwelling, Approved Document Part M recommends at least 1200mm of clear space in front of and between kitchen units and appliances. This is particularly important where islands, peninsulas or opposing runs of units are proposed.
M4(3) wheelchair-user dwellings provide more detailed requirements for kitchen layouts, including wheelchair manoeuvring space and accessible or adaptable working areas. These can also be useful design references when planning a kitchen for a known wheelchair user.
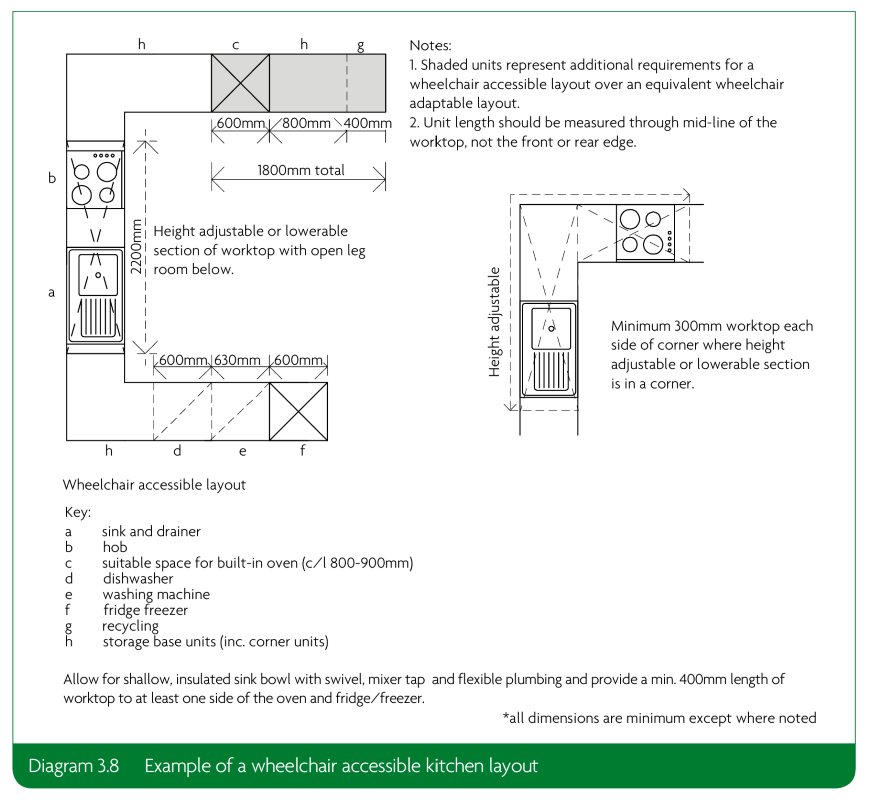
Image Credit: Approved Document Part M
Appliance Positioning
Frequently used appliances should be positioned so that they can be reached and operated comfortably. Ovens or microwaves placed too high or too low may be difficult to use, for instance from a seated position.
Their relationship with adjacent work surfaces is also important. Providing somewhere nearby to place hot or heavy items can reduce the need to carry them across the kitchen. In addition to this, appliance doors should not unnecessarily obstruct the main working area when open.
Worktop Heights and Knee Clearance
A single worktop height may not suit every user. Children, older people, wheelchair users and people of different heights may all interact with the kitchen differently. In some cases, sections of the worktop can be positioned at different heights or designed to allow future adjustment.
For seated users, clear knee space beneath selected work areas can provide closer access to preparation surfaces and sinks. M4(3) provides more detailed guidance on accessible and adaptable kitchen work surfaces.
Storage and Reach
Storage should be planned around what the user can comfortably reach. Everyday items are generally better positioned within an accessible reach zone, with less frequently used items stored higher or lower.
Pull-out drawers, adjustable shelving and accessible corner storage can make deeper cupboards easier to use. Where the kitchen is being designed for a specific resident, their reach and strength should inform these decisions rather than relying only on standard dimensions.
Accessible Bathrooms
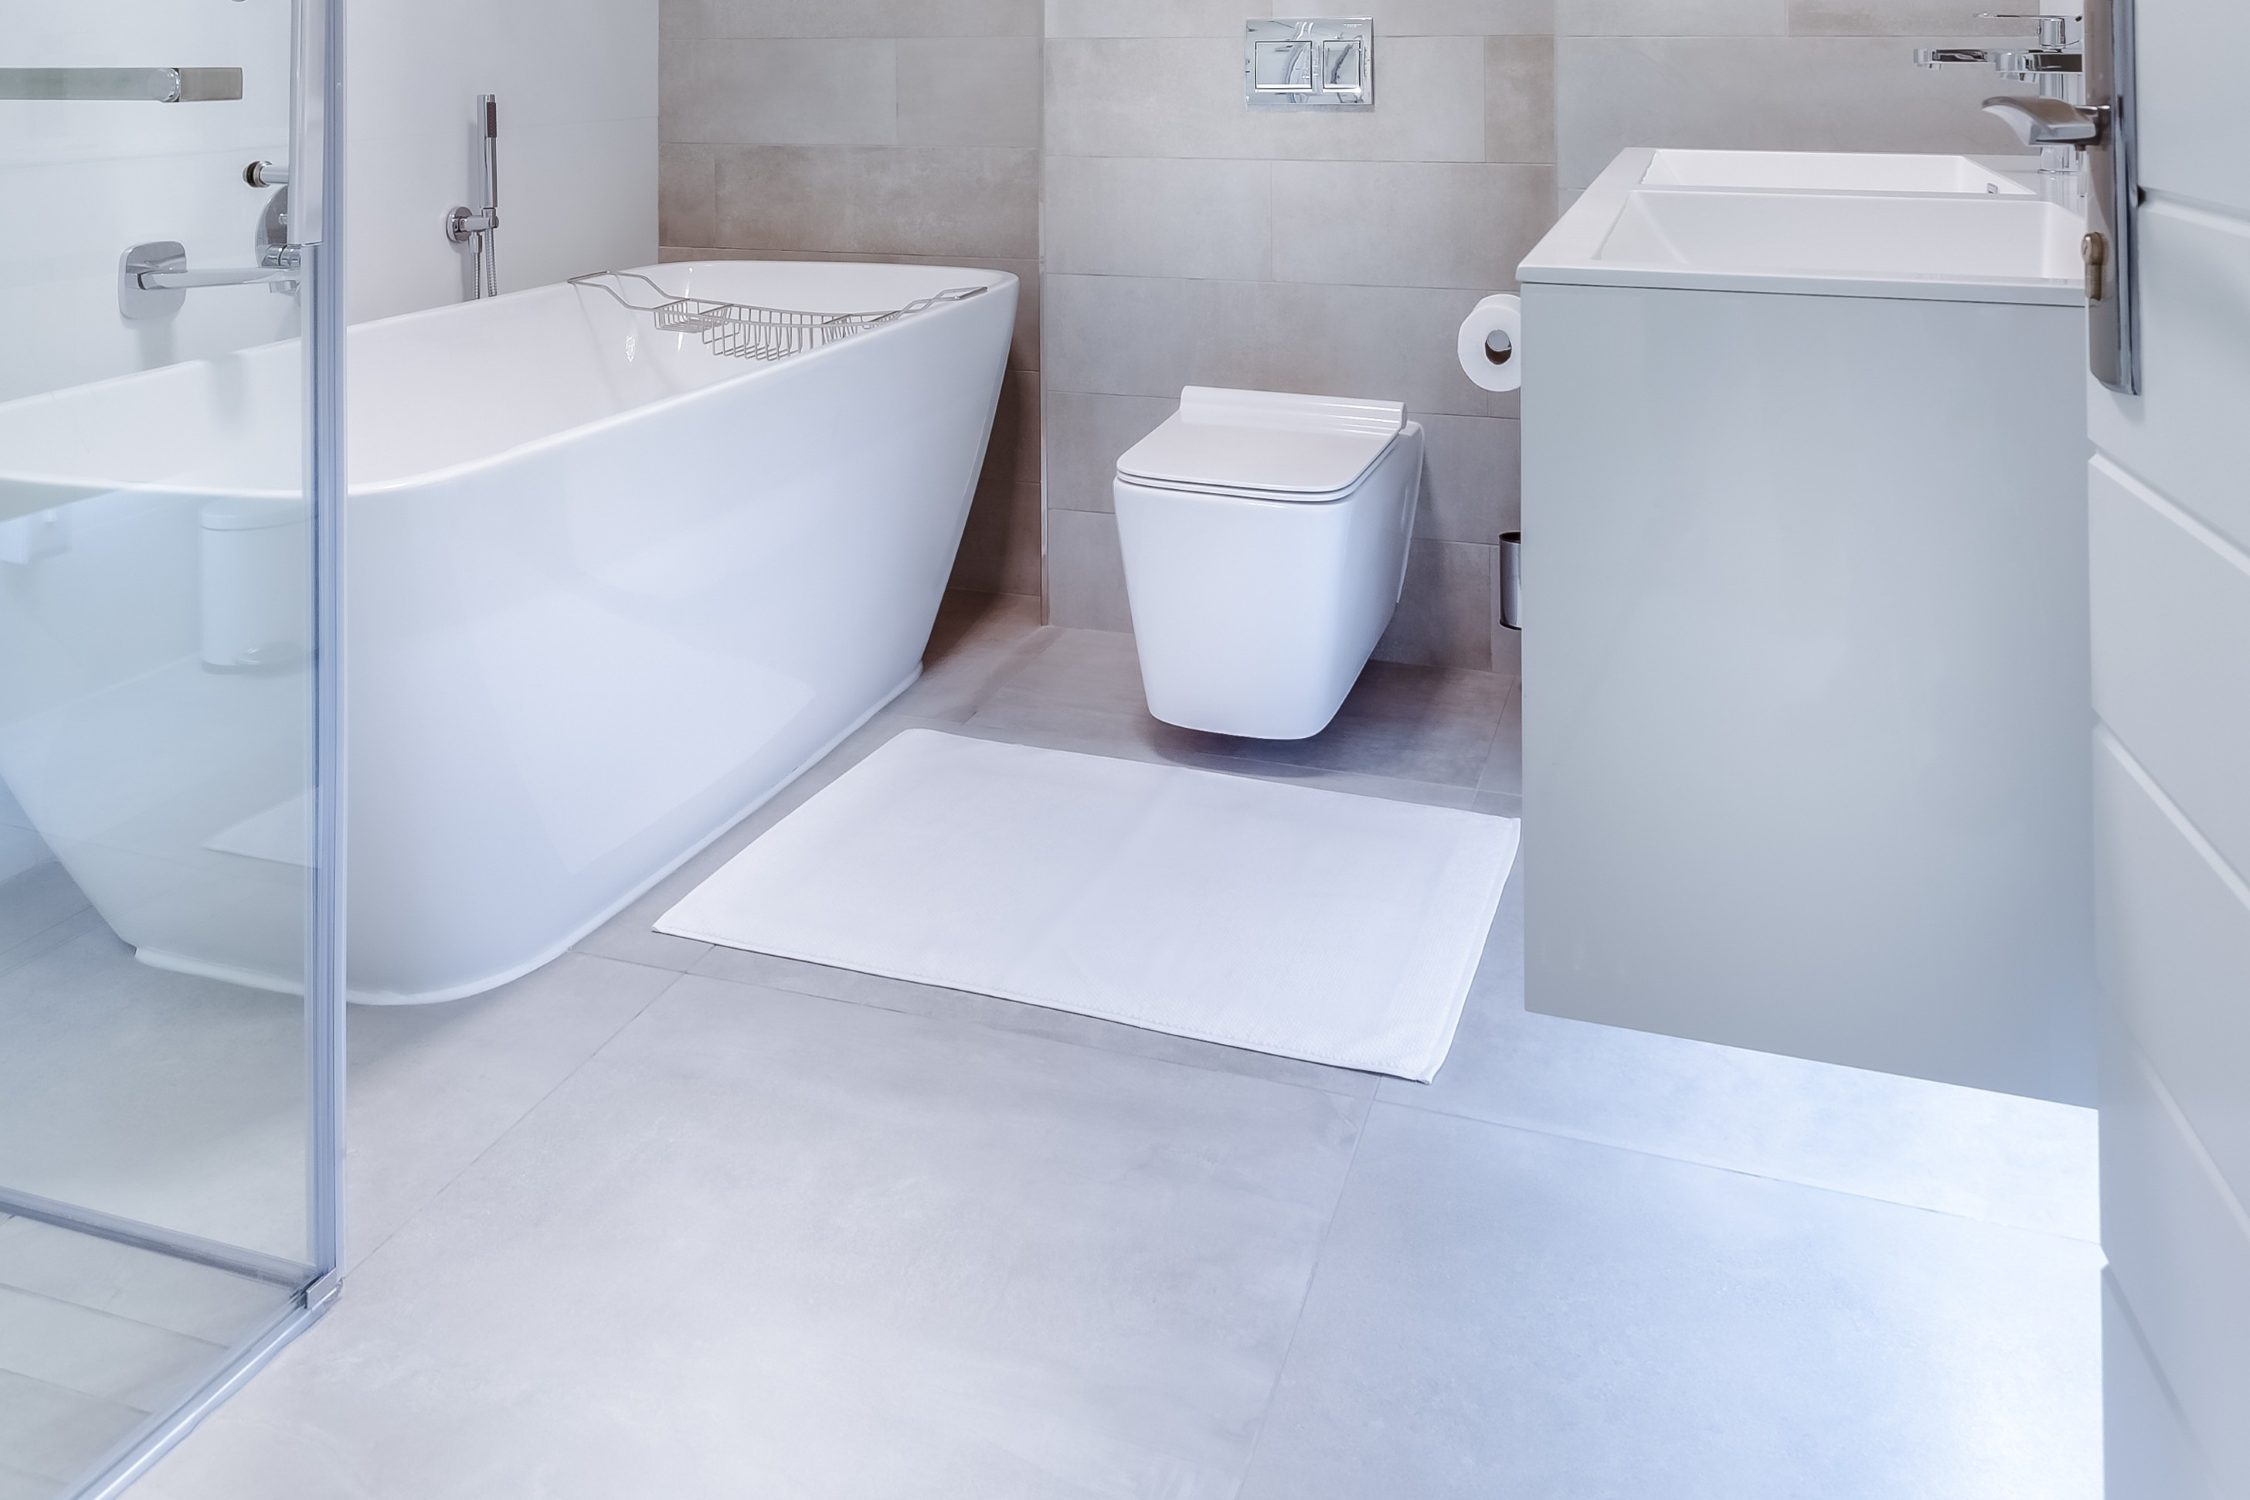
Bathrooms need to accommodate a range of activities within a relatively small space. The relationship between the WC, basin, bath or shower and the surrounding circulation space should therefore be considered from the beginning. Good planning can make the room easier to use now while also allowing it to respond to changing needs over time.
Planning the Bathroom
Start by considering the bathroom as a whole rather than positioning each fitting independently. The location of the WC, basin, shower and bath should allow someone to approach and use each fitting without one element obstructing another.
For an M4(2) dwelling, Part M sets out access zones around sanitary fittings. Diagram 2.5 illustrates the required clearances, while Diagram 2.6 provides examples of how these requirements can be brought together in bathroom and WC layouts. These are useful references when testing a proposed plan especially where space is limited.
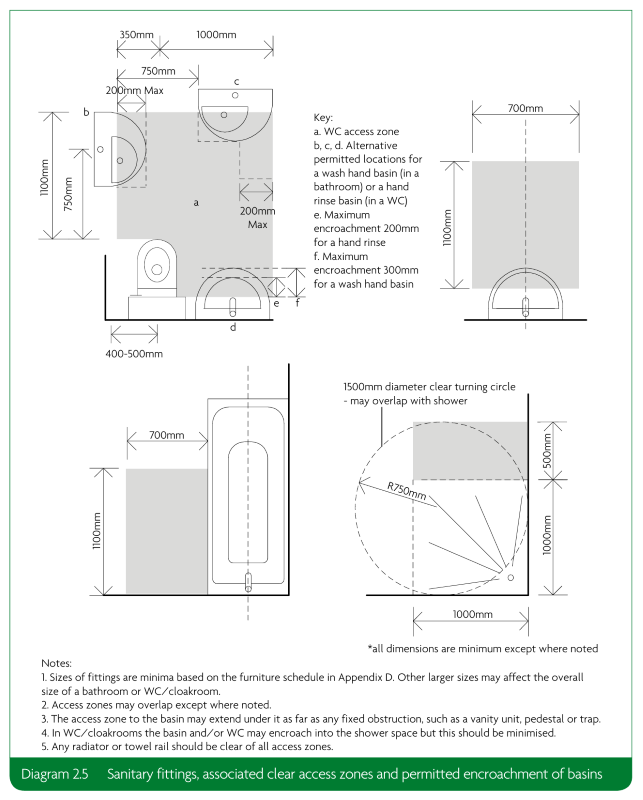
Image Credit: Approved Document Part M
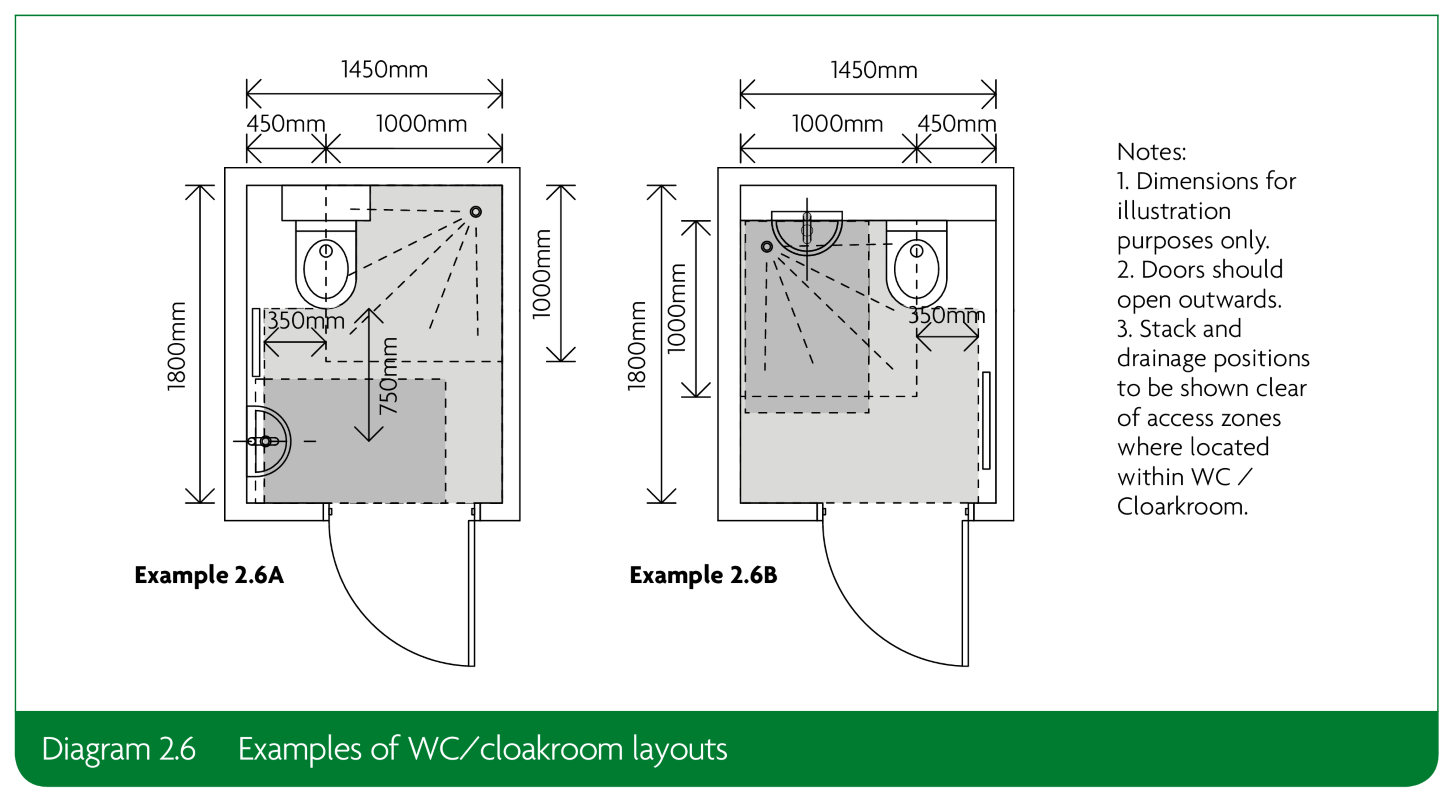
Image Credit: Approved Document Part M
The minimum dimensions should not automatically be treated as the ideal layout for every user. Someone using a wheelchair, walking aid or requiring assistance may need more space to manoeuvre, transfer or be assisted than the minimum provisions provide.
Where a project is being designed around a wheelchair user, the M4(3) guidance illustrates how much more space may be needed around sanitary fittings and for manoeuvring. Diagrams 3.10 and 3.11 provide useful examples of wheelchair-adaptable and wheelchair-accessible WC arrangements.
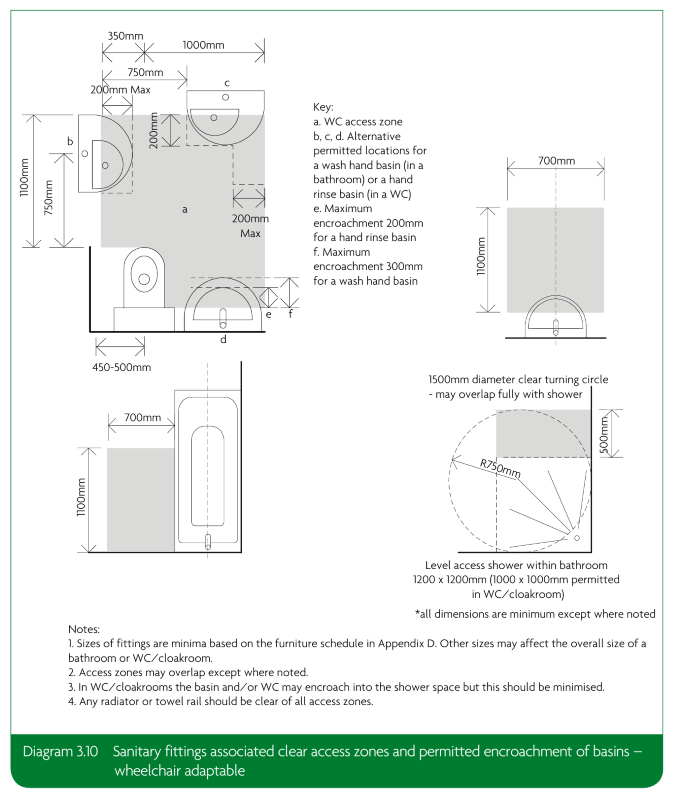
Image Credit: Approved Document Part M
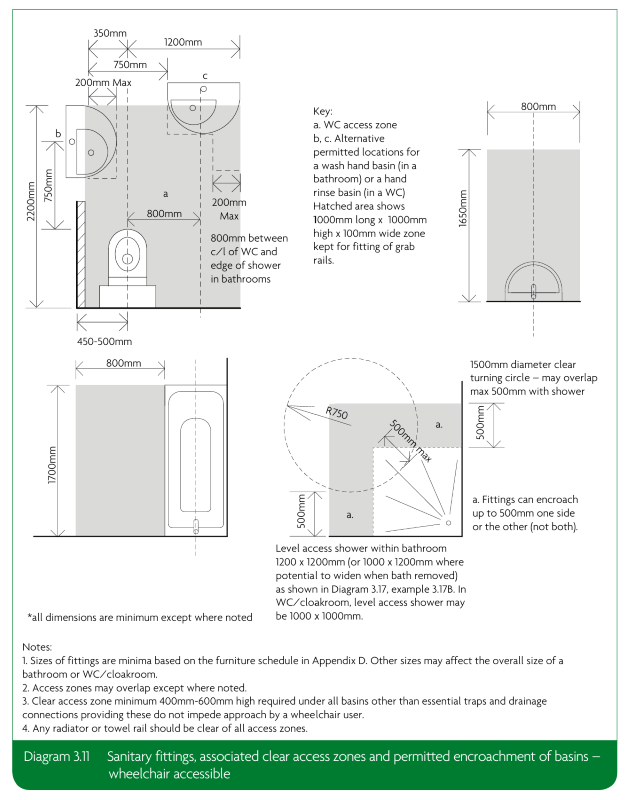
Image Credit: Approved Document Part M
Showering and Bathing
The choice between a bath, shower or combination of both should also be considered in relation to changing mobility. It is also worth questioning whether a bathroom needs to be organised around conventional bathing arrangements. A bath that works well when someone is fit and mobile may become difficult to use during an injury or period of reduced mobility. Designing with these situations in mind can help the bathroom remain useful as circumstances change.
A level access shower can make bathing easier for people with reduced mobility, but its position and size should be considered at the planning stage.
The level of accessibility required will influence how the bathroom is planned. For an M4(2) accessible and adaptable dwelling, the layout should allow for changing needs. For M4(3) wheelchair user dwellings, more specific requirements apply to the arrangement and accessibility of bathroom facilities.
Diagram 3.15 provides a useful example of how an adaptable bathroom can be planned with the potential for future wheelchair accessibility, while Diagram 3.16 shows examples of wheelchair-accessible bathroom layouts. They serve as useful references among the other diagrams included in Part M.
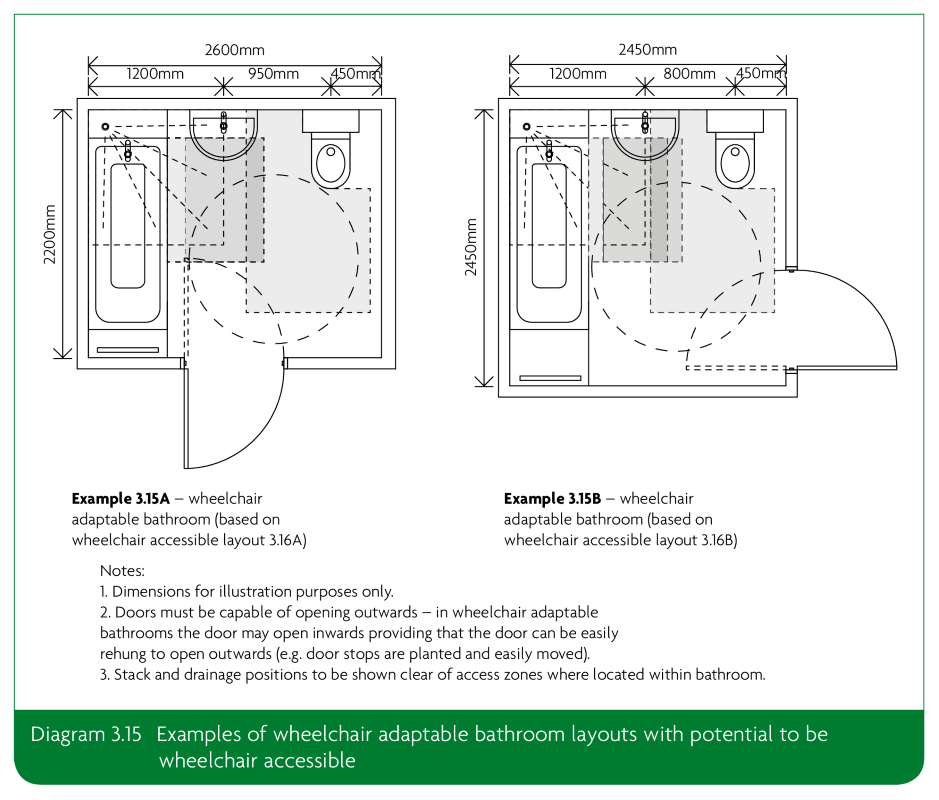
Image Credit: Approved Document Part M
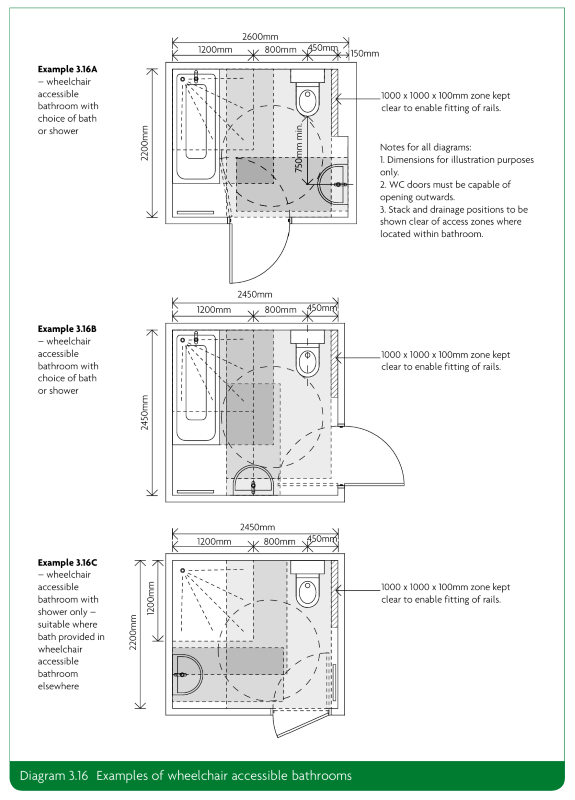
Image Credit: Approved Document Part M
Future Adaptation
Bathrooms are one of the spaces where planning for future adaptation can make a significant difference. A bathroom that works well today may need to accommodate grab rails, a shower seat or other support later, without requiring major alterations.
For an M4(2) dwelling, walls, ducts and boxings serving the WC, bathroom and shower room should be strong enough to support grab rails, seats and other adaptations imposing a load of up to 1.5kN/m². Where more demanding or highly localised adaptations are anticipated, additional strengthening may be required.
M4(3) goes further, requiring wheelchair-adaptable bathrooms to demonstrate how they could be altered to meet the requirements for a wheelchair-accessible dwelling.
The aim is not to make a bathroom look adapted before it needs to be. It is to build in the capacity for change, so that a relatively simple intervention can remain simple.
Stairs and Vertical Circulation
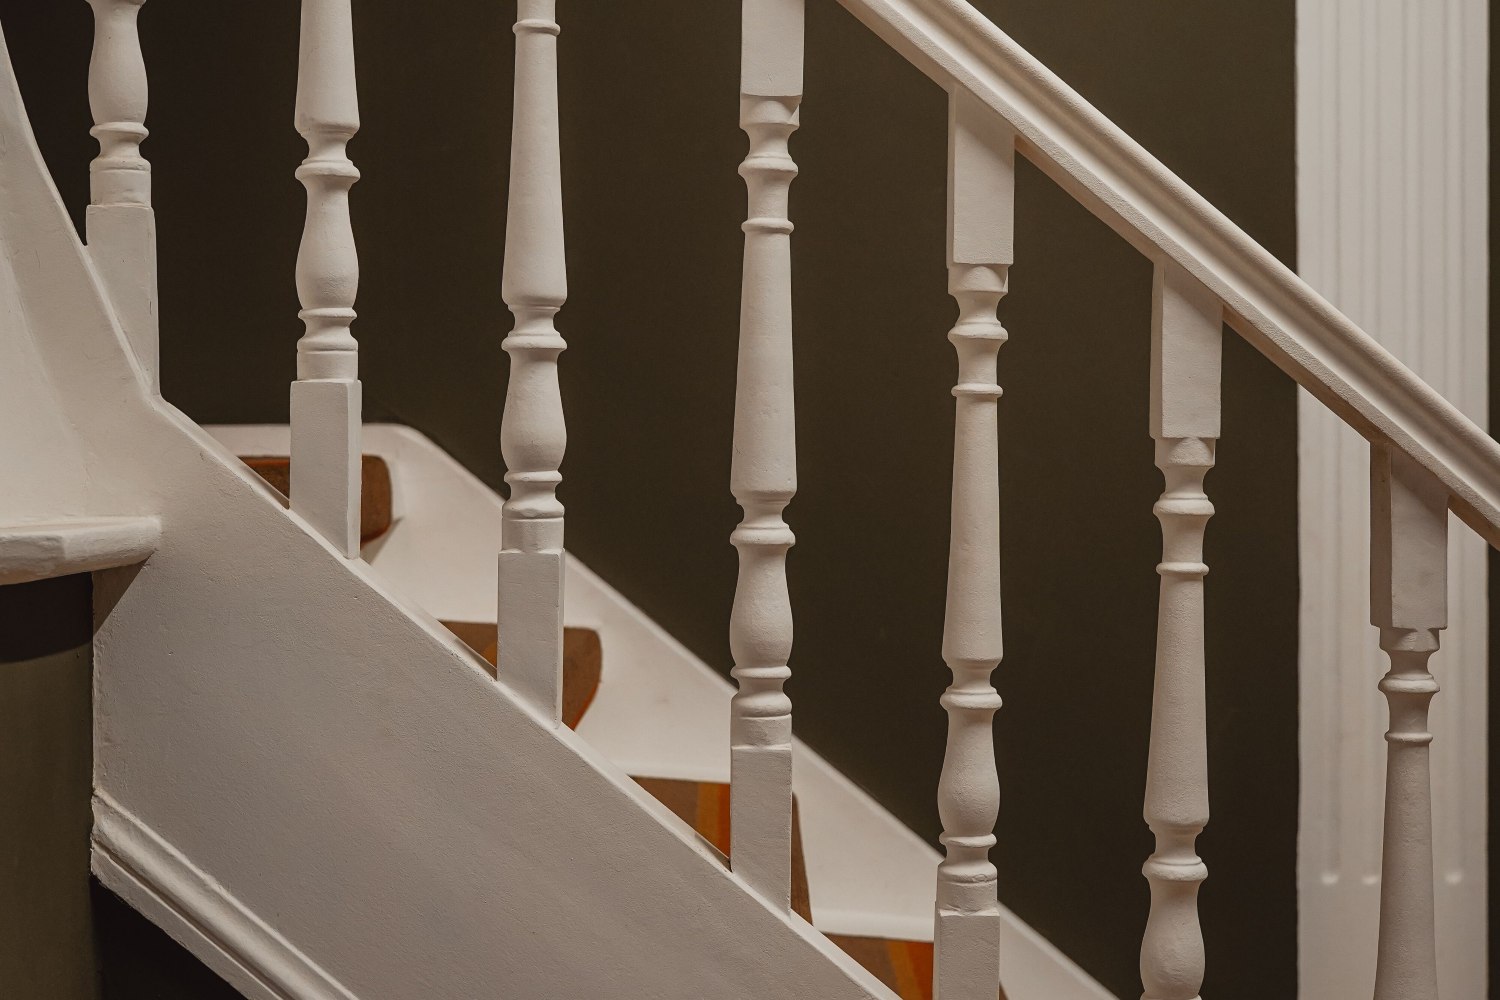
Stairs can have a significant effect on how usable a multi-level home remains over time. Their relationship with the rest of the plan should be considered alongside the needs of the people using them now and the possibility that those needs may change.
Geometry
A comfortable stair should have consistent risers and goings, with proportions that do not make climbing unnecessarily demanding. A steeper stair or shorter going may save space within a compact plan, but it can become increasingly difficult to use for someone with reduced mobility.
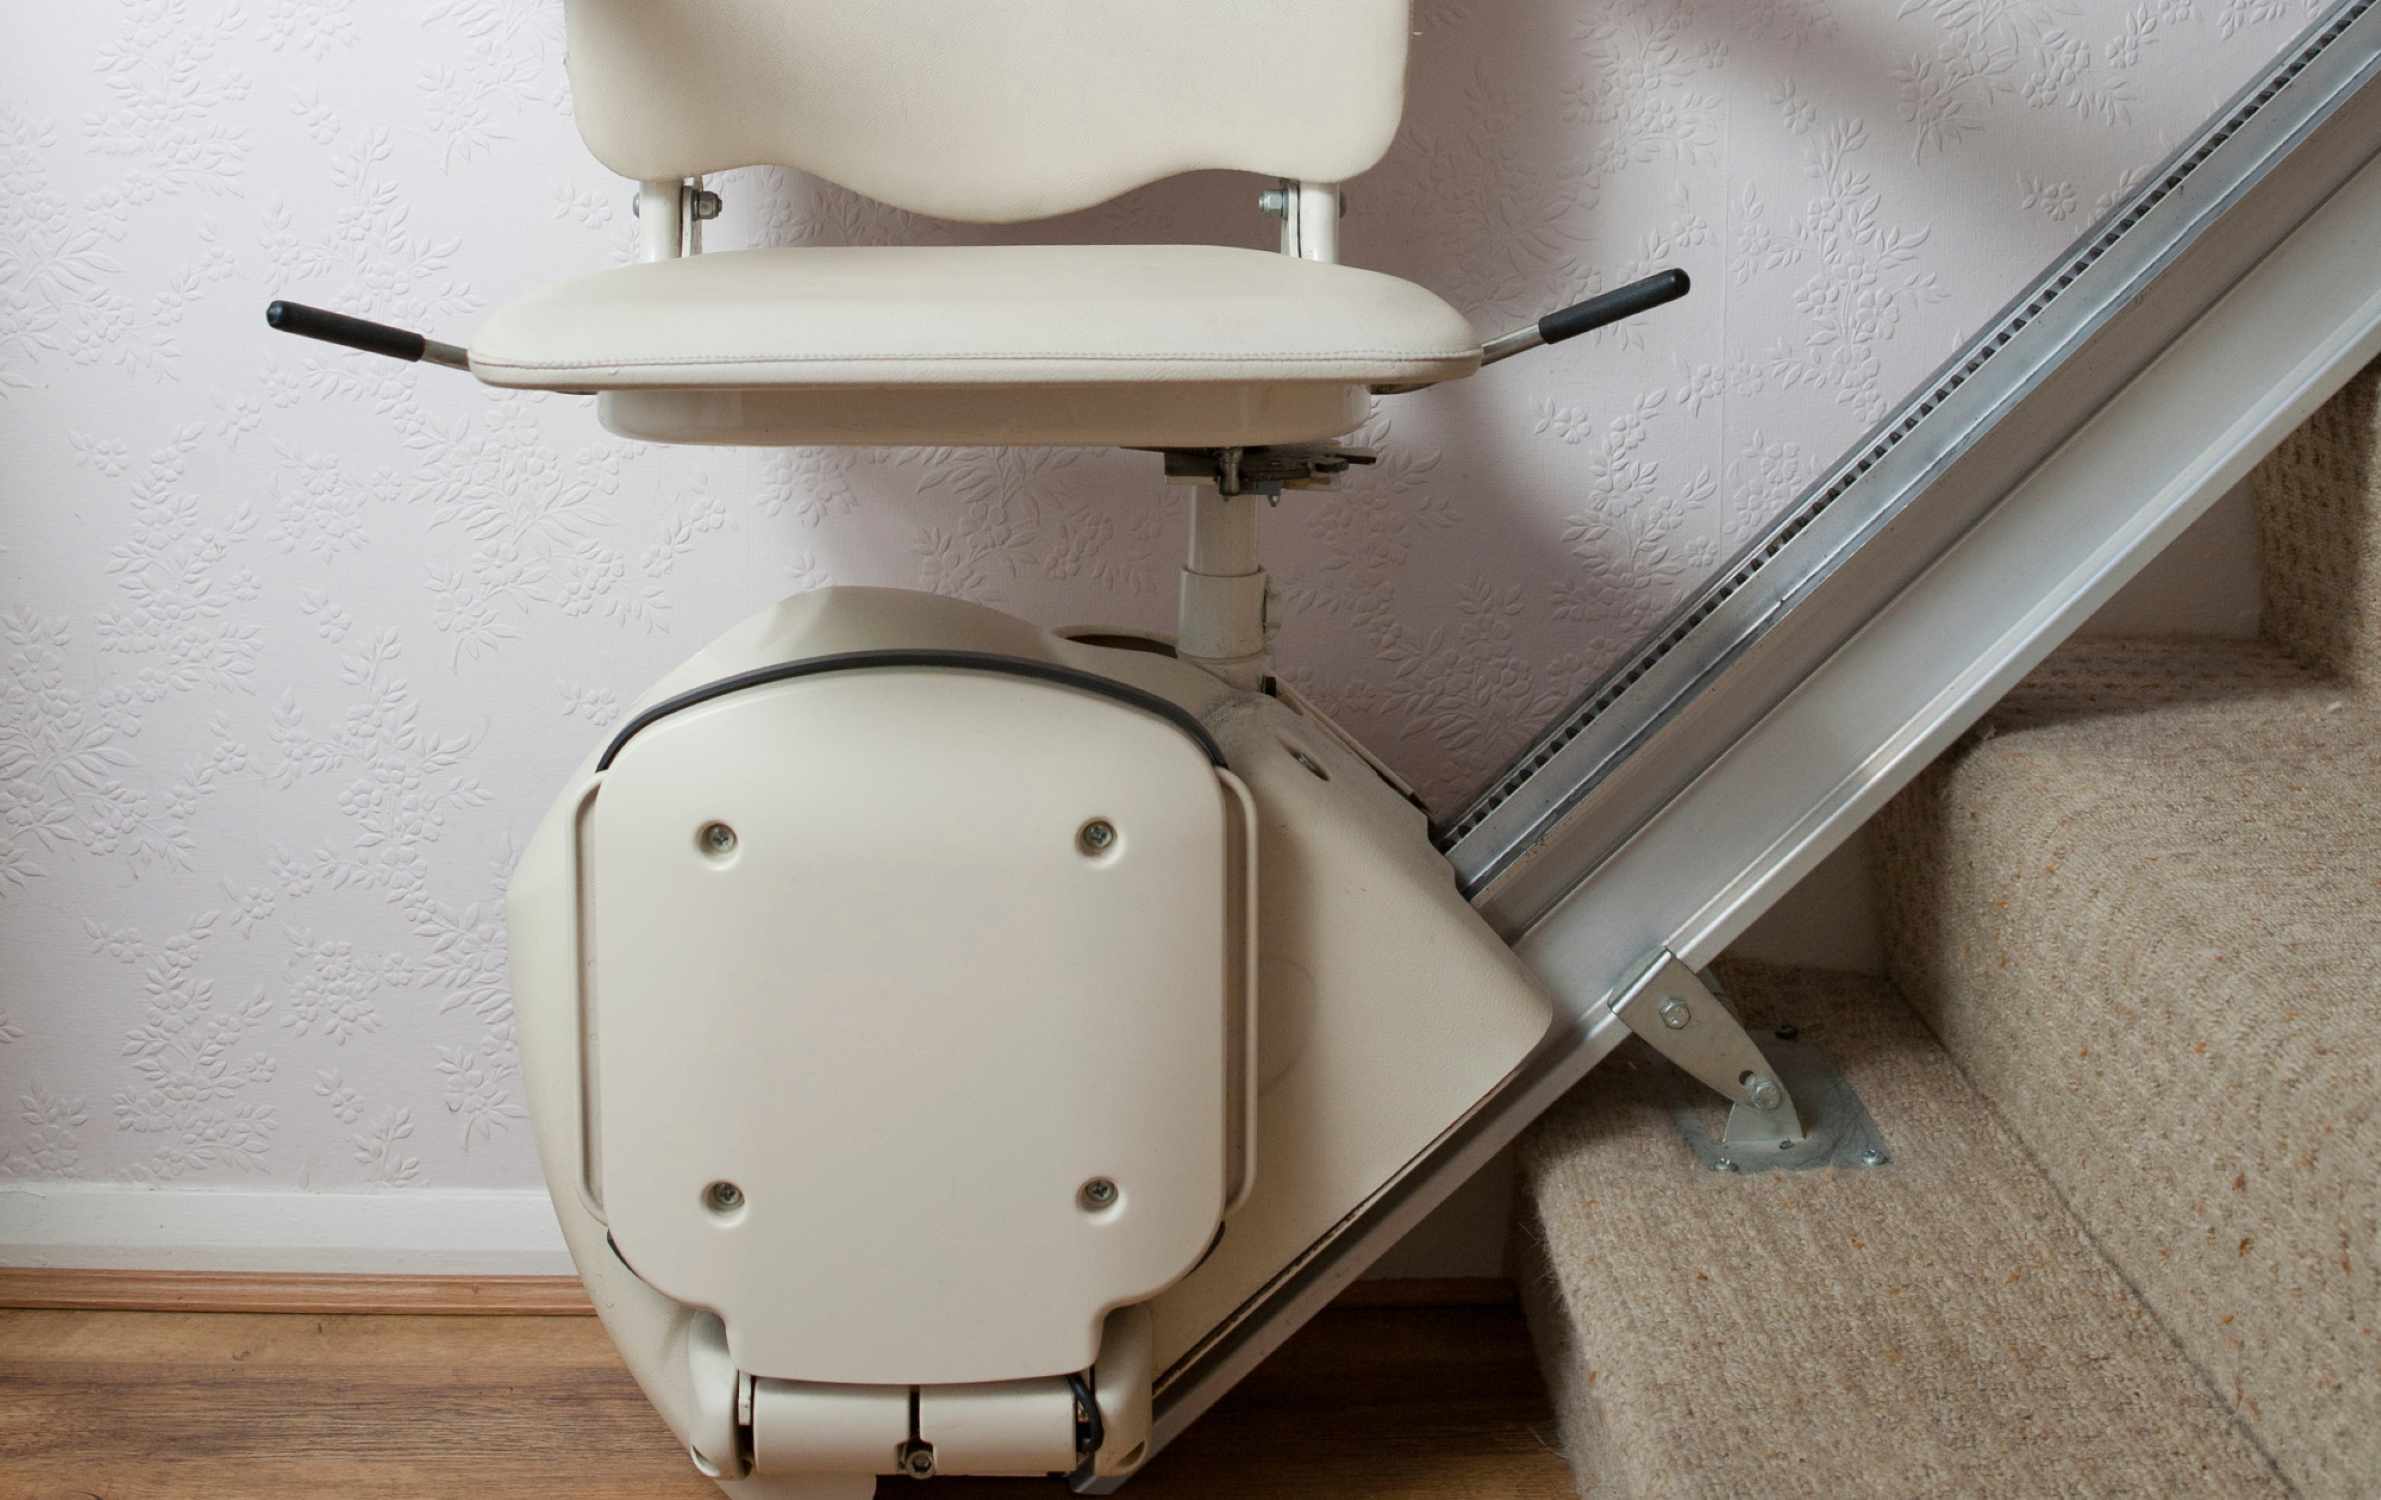
Part M provides accessibility requirements for stairs in dwellings, including provision for future stairlift installation in relevant M4(2) and M4(3) situations. For an M4(2) dwelling, the relevant principal stair should have a minimum clear width of 850mm, measured 450mm above the pitch line, to allow for the future installation of a stairlift.
This is a useful example of why stair dimensions should not be considered only in terms of fitting the stair into the plan. The space may need to accommodate a different way of using it later.
Handrails and Landings
Handrails should provide reliable support and be positioned so they can be comfortably grasped while ascending and descending. Their position, profile, visual contrast and materiality can all affect how easily they can be identified and used.
Stair safety should also be considered alongside accessibility. It is covered by Approved Document Part K – Protection from falling, collision and impact.
Landings should also provide enough space for people to manoeuvre without creating conflicts with doors or other circulation routes. Their position should also be considered alongside potential future adaptations, like where a stairlift may need to arrive or depart at the top or bottom of the stair.
Level Changes
Vertical circulation does not always have to mean simply adding a staircase. Split levels and mezzanines can create useful architectural variety, but the way people reach and use those spaces should be considered as part of the design.
If a level change is primarily aesthetic, consider whether the same spatial interest could be achieved without introducing an unnecessary barrier. Where different levels are important to the design, the route between them should be considered as carefully as the rooms themselves.
Future Vertical Access
A future lift can be considerably harder to introduce once a building is complete. Its potential location should therefore be considered while the floor plan and structure are still being developed. Structural openings, support and sufficient circulation space at each level may all need to be accommodated.
Even where a lift is not currently required, testing a feasible location on the plan can help preserve future options and avoid major structural alterations later.
M4(3) goes further, requiring wheelchair access to all parts of the dwelling, with specific provisions for movement between storeys.
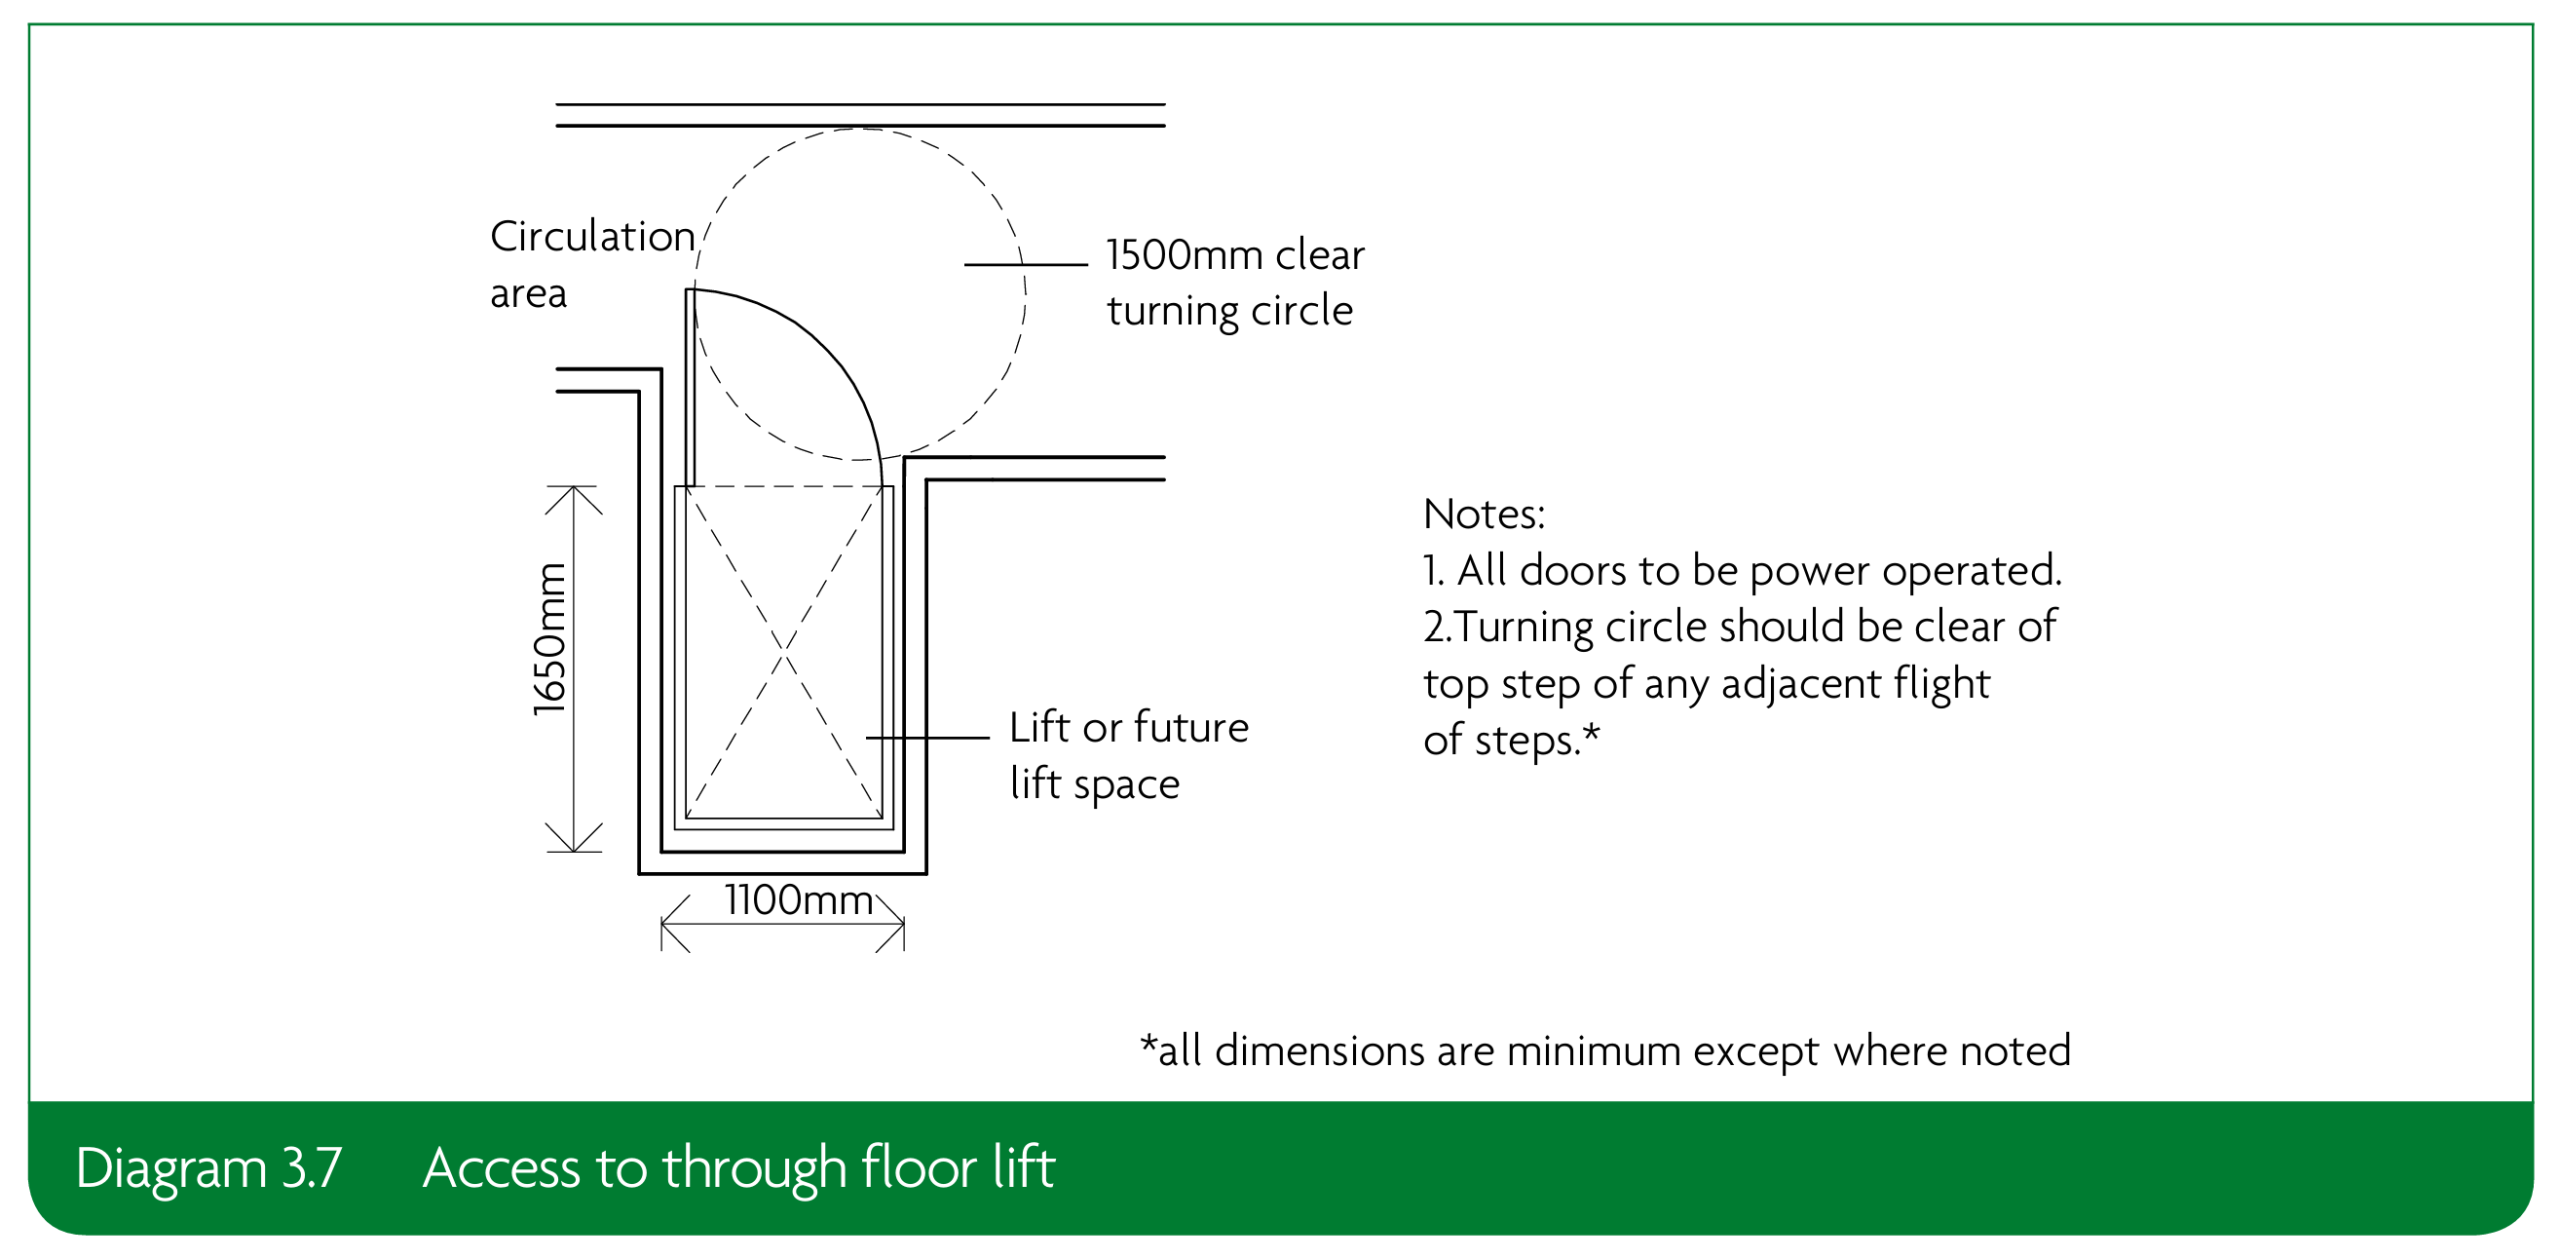
Image Credit: Approved Document Part M
Accessible Bedrooms

Bedrooms are an important part of the home and may need to serve different purposes over time. Thinking about how this space could be used in the future can help avoid changes becoming difficult or costly later on.
Bedroom Location
In a typical two-storey house, bedrooms are often concentrated on the first floor. Providing a bedroom on the entrance storey can give the household an alternative if stairs become difficult to use.
For new housing schemes, this could also mean considering a proportion of single-storey homes alongside two-storey properties. This could help provide different ways for people to live comfortably within the development.
Where a home is being designed for a wheelchair user, Part M‘s M4(3) provisions provide more specific requirements for bedroom provision and its relationship with an accessible bathroom.
Furniture clearance
Bedroom layouts should allow furniture to be positioned without making the room difficult to move around. Beds, wardrobes and other storage can restrict circulation, so proper attention needs to be paid to their placement.
For M4(2) dwellings, Part M also sets out minimum access zones around beds, including a 750mm clear route from the bedroom doorway to the window, with 750mm access zones to both sides and the foot of the principal double bed. Other double, single and twin bedrooms have their own access-zone requirements.
For M4(3) dwellings, the requirements become more extensive: all bedrooms need to be wheelchair-accessible, with a principal bedroom located close to an accessible bathroom.
Diagram 3.9 provides a useful example of how the required access zones can be incorporated into a bedroom layout.
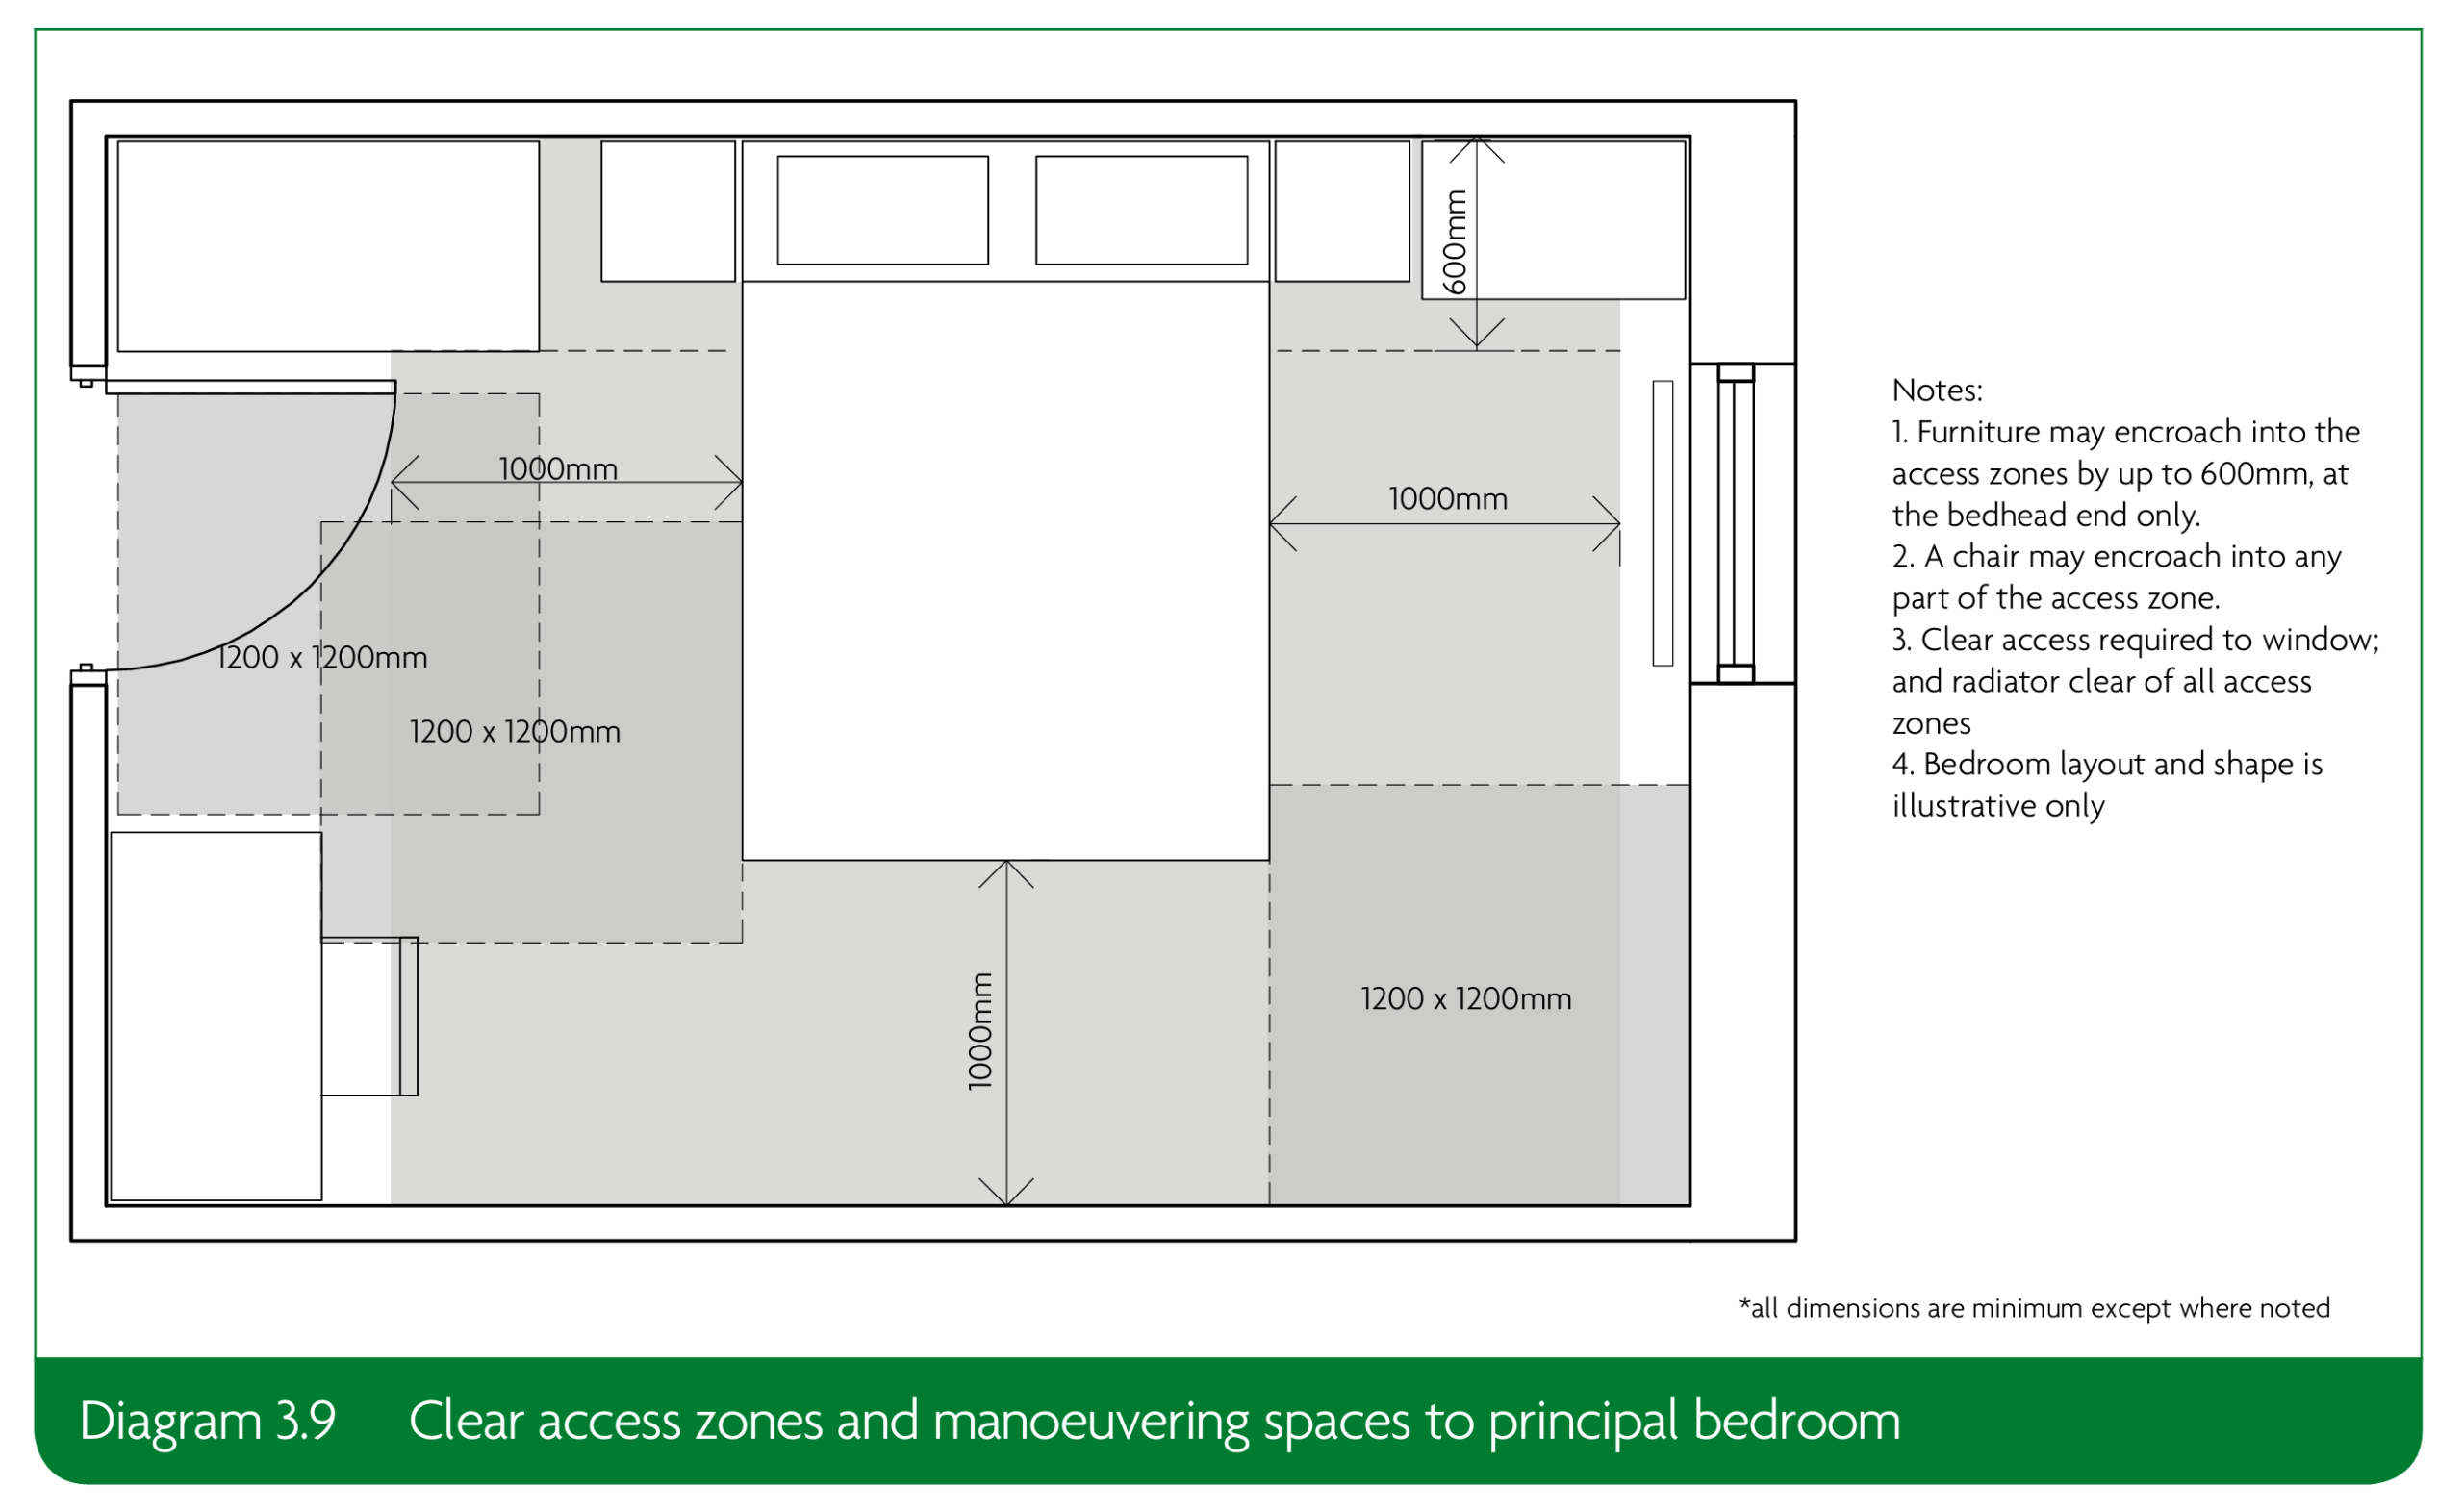
Image Credit: Approved Document Part M
Ensuite provision
The relationship between bedrooms and bathrooms can become increasingly important where mobility or care needs change. Where possible, placing a bathroom or shower room close to the bedroom can reduce unnecessary journeys through the house.
For M4(3) dwellings, Part M requires an accessible bathroom to be located close to a principal bedroom. This provides a useful planning principle beyond simply meeting the minimum: consider the bedroom and bathroom as a connected part of the home rather than two unrelated rooms.
Planning for Adaptability
Consider which walls, openings and spaces could realistically need to change over the life of the building. Where appropriate, non-loadbearing partitions can provide greater freedom for future reconfiguration, while structural elements should be positioned so they do not unnecessarily restrict potential changes.
Service routes should also be considered early. Providing accessible routes for plumbing, drainage, electrical installations and other building services can make future alterations easier without requiring extensive work to the structure or finished spaces.
Future changes may extend beyond accessibility adaptations. A family might need an additional bedroom, a home office may become a bedroom, or a loft may eventually be converted into living accommodation.
Where these changes are reasonably foreseeable, consider opportunities such as:
- allowing for future openings or knock-throughs where structurally appropriate
- planning potential routes for new services
- identifying where a future extension could connect to the existing layout
- considering roof structure and access where a loft conversion may be possible
- positioning rooms and circulation routes so that internal reconfiguration remains realistic.
The objective is not to predict exactly how a home will be used in twenty years, but to avoid unnecessarily fixing the building into one arrangement from the outset.
Accessible Home Layout Checklist

Use this checklist when developing your accessible home layouts.
Arrival and Entrance
- Is there a clear and convenient route from the site boundary, parking or drop-off point?
- Can the principal entrance be used step-free?
- Is the entrance easy to identify, approach and operate?
- Are accessible routes equal in quality to other routes?
Layout and Circulation
- Are routes through the building direct, legible and sufficiently generous?
- Can people move between key rooms without unnecessary barriers?
- Are doors, corridors, turning areas and level changes being considered together?
- Could furniture layouts reduce the usable circulation space?
Spaces and Relationships
- Are essential rooms located where they can be reached easily?
- Is there an accessible toilet or bathroom arrangement where required?
- Can kitchens, bedrooms, workspaces and shared rooms support different users?
- Are privacy, dignity and assistance needs reflected in the layout?
Environmental Comfort
- Does the concept provide good natural and artificial lighting?
- Are glare, excessive noise and visual clutter being reduced?
- Could colour, contrast and views help people understand the building?
- Are quiet or lower-stimulation spaces needed?
Future Flexibility
- Could rooms be adapted without major structural alterations?
- Are walls, openings and structural elements positioned to preserve future options?
- Could a lift, hoist, accessible shower or additional bedroom be introduced later?
- Are initial-cost savings likely to create expensive barriers in future?
Helpful Links
Designing for Part M: A Practical Guide and CAD Block Library
Building for Everyone Complete Series – Centre for Excellence in Universal Design
Lifetime Homes – Habinteg/CAE
Occupational Therapists input on the design of housing – Housing LIN
Access to and use of buildings: Approved Document M – GOV.UK
Protection from falling, collision and impact: Approved Document K – GOV.UK
Books
Here is some accessibility related further reading:
You might also be interested in
We have loads of other accessibility content. Be sure to check it out.


Key Takeaways
Good accessible layouts begin by understanding how the home will actually be used. Start by identifying the spaces that are central to everyday life, then consider how the rooms around them connect. The right spatial adjacencies can make movement through a home feel natural rather than something that requires constant effort.
Accessible planning is not simply about achieving a particular dimension. Clear routes, sensible door positions, space to pause and manoeuvre, and practical furniture arrangements all contribute to how easily someone can move through and use a home.
It is also important to test the design in three dimensions. A plan may appear to work on paper, but section and elevation can reveal issues with changes in level, approach gradients, sightlines and the way spaces are actually experienced. Accessibility should therefore be considered as a spatial experience, not just a collection of measurements.
Flexibility is another important part of good planning. Allowing enough space and identifying realistic opportunities for future adaptations can make it easier for a home to respond when circumstances change, without requiring major alterations to the structure or layout.
A well-resolved floor plan can quietly remove barriers before they ever become a problem.

Author
Written by Valanne Fernandes, a Part 2 Architecture graduate. Valanne is a content creator with First In Architecture, spending her time researching, writing and designing inspiring new content for the website.


0 Comments